Showing posts with label photoshop. Show all posts

Saturday, February 4, 2017

Grunge It, Part Deux


In Part I of my Blog post on processing images with some "grunge" I tried to show how using this technique can be one of the weapons you should have in your arsenal of image processing. In this segment, I'll walk you through how I create some of my grungy images.

There are a lot of ways to create the grunge effect and it can be as mild or as heavy handed as your taste desires. The grunge effect I typically use is distinguished from another kind of grunge effect where an image is layered over a grungy-like textured background and the opacity of the main image is reduced to allow some of the background grunginess to come through. Here are some examples.


You can create the grunge effect I use in Photoshop, using layers and several of the tools in the program that allow you to transform any image into one with the grunge feel. If you're not interested in devoting that much time and effort into processing, you have another option - OnOne Software's Perfect Effects Photoshop plug-in. Follow along as I show you an easy way to create a grunge composite using Perfect Effects. 

Let's do something unconventional and use a portrait of a woman to create the composite. Normally, I don't want to detract from a woman's beauty by adding grain, heavy contrast, and lots of clarity but I'll go out on a limb and see what happens. I'll start with the background.

I opened the background image in Photoshop. It's a beach wedding scene and you'll see why in a minute.

I clicked on the "File" tab at the top, scrolled down to "Automate", and sent the image to OnOne's Perfect Effects (in this case, it's a module within my Perfect Photo Suite but it's also available as a stand alone plug-in).


On the left side of the screen where the Perfect Effects menus is located, I went to the Grunge tab and opened it to reveal the various options. I selected "Arkham", a dark, grungy preset. and clicked on "Apply" to apply the effect and send the image back to Photoshop with the grunge look.


Now for the model. Before I open that image, a few notes. I shot the image with using some dramatic lighting. I used strip soft boxes slightly behind the model on either side to create a rim light highlight all around her. A beauty dish was set up high and left, at an angle to her face, for my key light. A 4'x8' soft box was positioned in front ant to the right as the fill light. The key light was metered at f11, the fill light at f8, and the strip soft boxes at f5.6. Two additional lights were used to blow out the white seamless paper background metered at f16. These lights reflected some light onto the model's back creating an additional source of rim lighting.


OK, now let's open the image. Why, it's a model in a wedding dress! Fits pretty well with our beach wedding background, huh?


As with the background, I sent it to Perfect Effects and applied the Arkham effect.


I used the Quick Selection Tool to "select" the model and refined the selection using the Edge Detection brush to remove the white background from the tricky areas like the area around the hair, lace, etc.

I then reduced the opacity of the OnOne grunge layer (when the image is sent back to Photoshop from Perfect Effects, it comes back as a separate layer) down to 50% so it wasn't so harsh on the model. If it wasn't a woman, I might or might not reduce the opacity of this layer.


Next, I dragged the image of the model onto the background layer.


From a composition standpoint, I thought it would look better to flip her image horizontally so I used "Edit - Transform - Flip Horizontal" to do so. I then positioned her to my taste.


The next step was reducing the opacity of the background. I didn't want it to detract from the model so I created a duplicate background layer, reduced the opacity of the duplicate background layer, hid the original background layer, and flattened the image.


Because the model's image did not fill the entire frame on the background, I cropped the image at the top to remove the excess background.


Here's the final image.


All in all, it takes approximately fifteen minutes from start to finish. As you go along, adjustments can be made to taste, such as making the grunge effect on the subject more or less prominent. The same goes for the background.

Perfect Effects is available as a download and you can try it out for free before committing to buying it. You can buy just the Perfect Effects module for $59 or the entire suite of software for $109. I've been using their software for years and don't know what I'd do without it.

Friday, August 5, 2016

Grunge It


One of my favorite effects for images is what's commonly known as "grunge". It has a desaturated, grainy, textured look that adds mood and mystery to an otherwise tame image. It lends itself to images of athletes and I use it frequently when processing athlete composites.

Throw in some dramatic lighting, layer the image of the athlete over a background that adds context and drama to the image, and a transformation from mundane to eye catching takes place.

Several times after posting some of my grungy, composite images I've been asked how I create this effect in my images. I'll walk you through one process I use but first some background.


I've had the great fortune to learn how to create grunge composites using athlete images from Joel Grimes who not only pioneered this look but who has taken it to levels that I try to imitate but never with anything remotely close to the same results. The man is color blind so you would think that would be a major impediment to creating his incredible composites but his imagination and vision is unparalleled. I know that my end product will never measure up to his images but with every attempt I get a little better.


I've used the grunge effect on images other than sports composites and in many cases it seems to work well. I've tried it on landscapes, street images, informal portraits, studio images, and many other images I've taken.


Images that lend themselves particularly well to the effect are portraits (formal or informal) of older men with weathered faces.


Look for Part II on a couple of different ways you can add grunge to your images. I'll try to post this follow up soon.

Saturday, December 6, 2014

How To Create Fog, Haze and Sunbeams In An Image

Preparing for my first cover shoot for Tallahassee Woman Magazine, I've been thinking about how to pull off the shoot and create a cover image that will set the tone for future covers. When I was hired to shoot covers for the magazine a couple of weeks ago, I was told that they wanted to take their cover images in a new direction - more artistic, edgy stuff. For the January/February issue, they were thinking of a cover image of the person being featured in the magazine shot in the woods with a misty, foggy feel to the image. This is a radical departure from the magazine's past covers which were typically studio portraits of the cover person. I love doing artsy fartsy, edgy stuff and am looking forward to letting the creative juices flow.

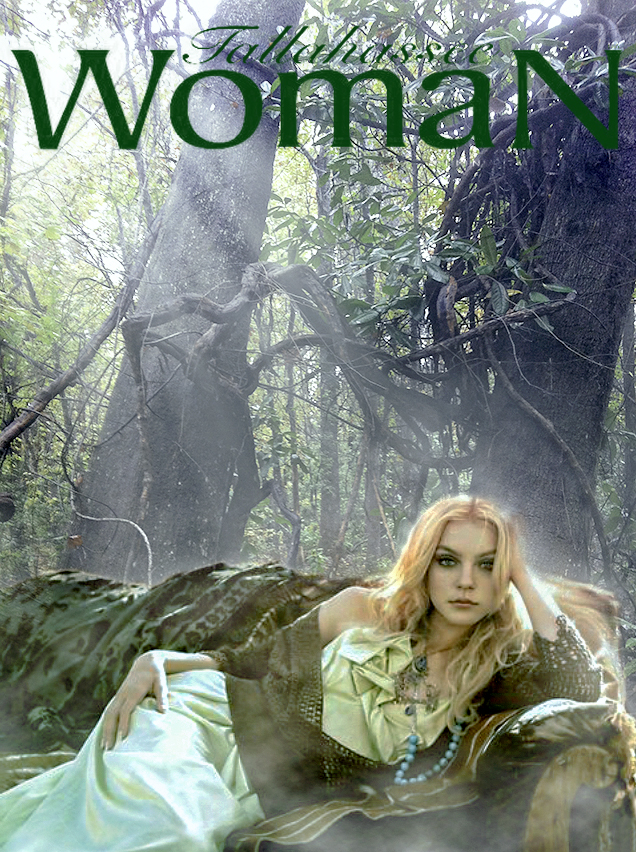
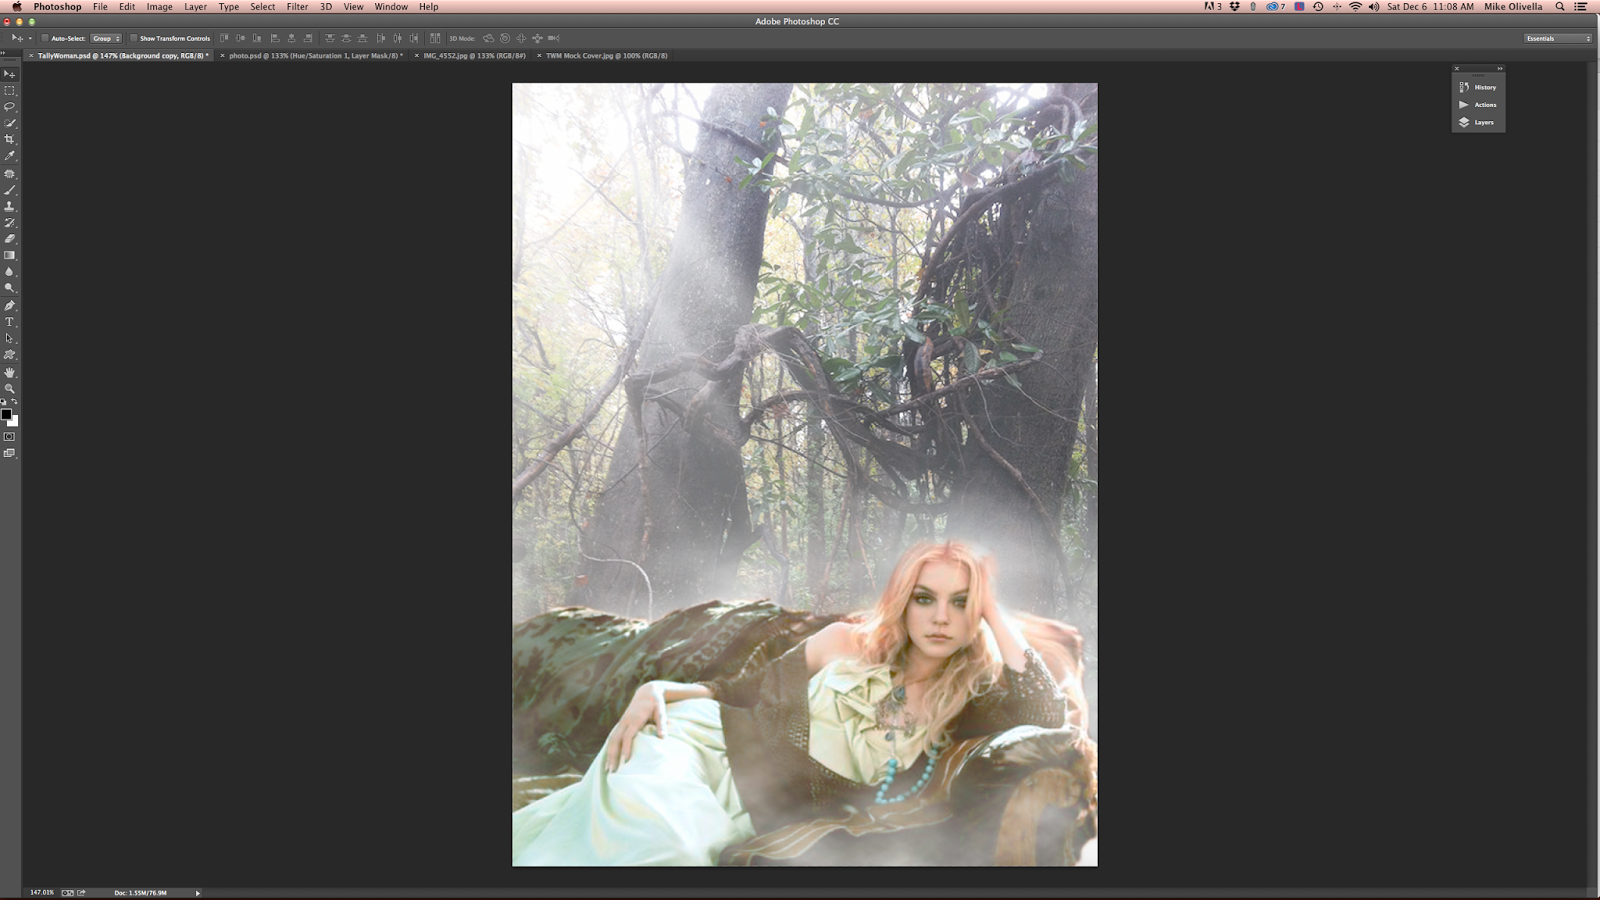
Thinking about the upcoming cover, I started playing around in Photoshop to create a mock cover to run by the folks at the magazine to make sure what I envisioned was in line with what they envisioned. This is what I came up with, using an image I took while touring the location for the shoot and adding a stock image of a model reclining on a couch.

The mock cover I created
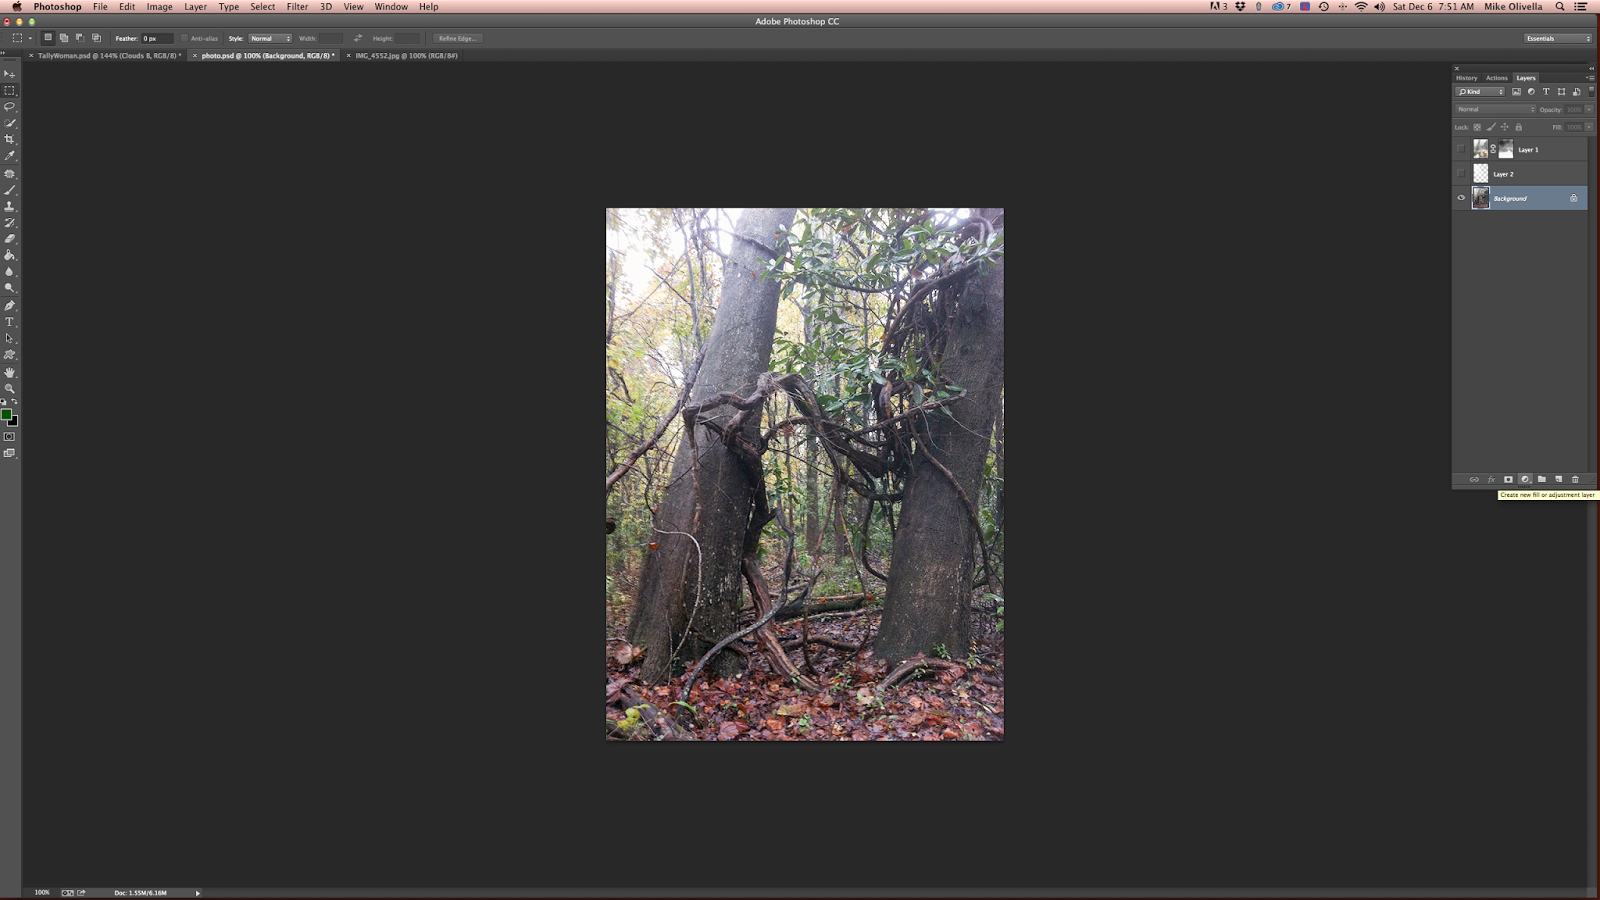
Below is the original iPhone shot I took of the wooded scene. While scouting the property, I found several sites that I thought would be great locations for the shoot but this particular one really caught my eye - two large oak trees intermingled with magnolia tree branches that looked like huge vines. I had been told during the planning process that there was a moss covered couch available for the shoot and that we could use it as a prop. In my mind, I could picture how perfect the couch would fit in the foreground of this scene, making it the perfect setting.


A few days before I toured the property, I was sent a stock image by the person I will be shooting - a model reclining on a couch - a pose that she really liked. 


Cutting the model out of the stock image, I dropped her into my iPhone shot of the site and went to work in Photoshop to add mist, fog and haze. Here's how I did it.
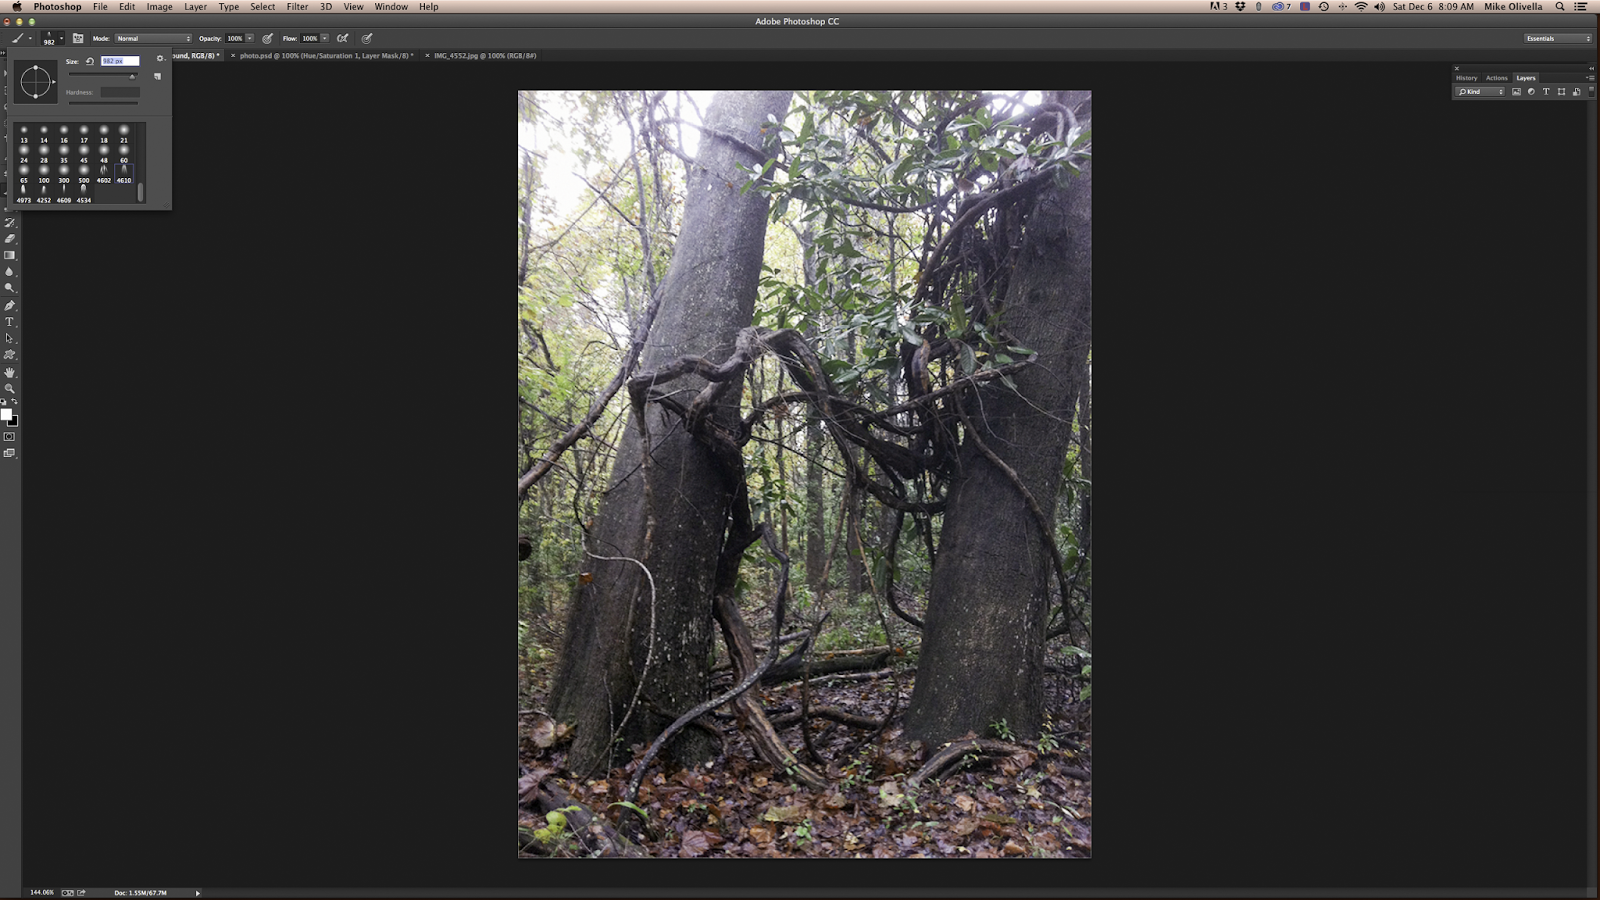


The first step was to process the iPhone shot in terms of exposure, bringing out the shadows and highlights using the Camera Raw filter in Photoshop CC.


Step 2 was cutting the model out of the background and doing some color correcting. The original image was sepia toned and while I knew I could never get it to have the correct color, I at least wanted it to blend with the woods better than if it was sepia toned. This is what the cutout looked like after I dropped it into the new background.


Now it was time to add some atmosphere and mood to the composite, i.e. fog, haze and sunbeams. If you take a close look at the cutout of the model, you can see that I purposely left some white haze around her head when I cut her out of the background. This was done using the Refine Edge feature of the Selection Tool, adding some feathering to the cutout and then brushing out the feathering in areas other than around her head.

Step 3 was to add a haze to the woods. Here's how I did it as described in the captions to the images below. As a caveat, I'm assuming you're familiar with Photoshop Tools/Palettes and their various features. If not, you will have to familiarize yourself with them before going forward.

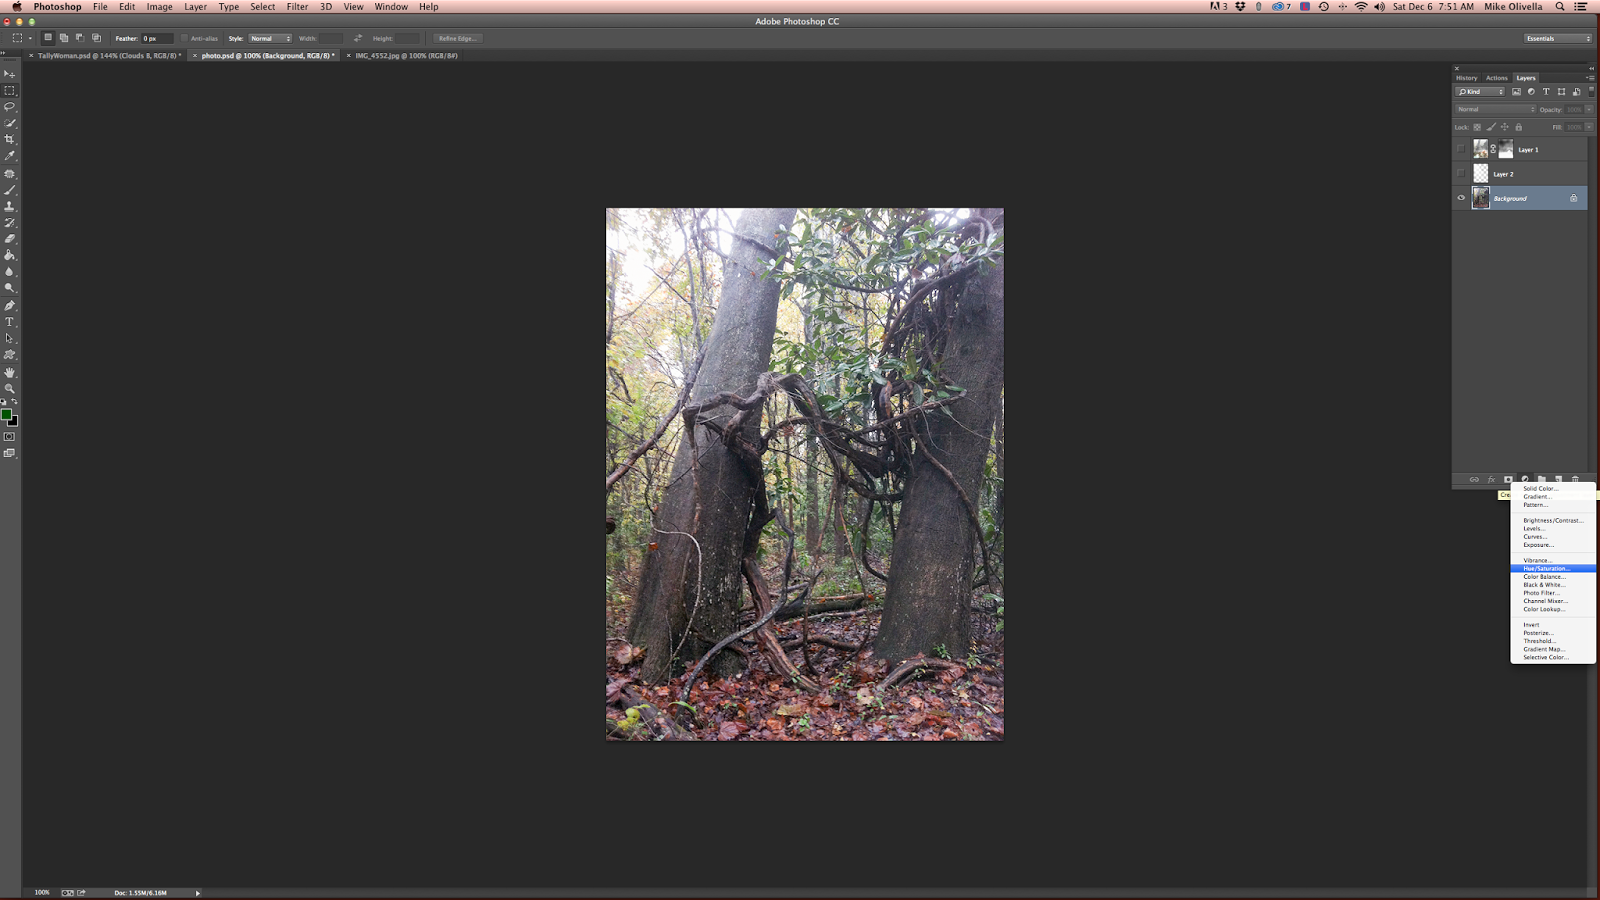
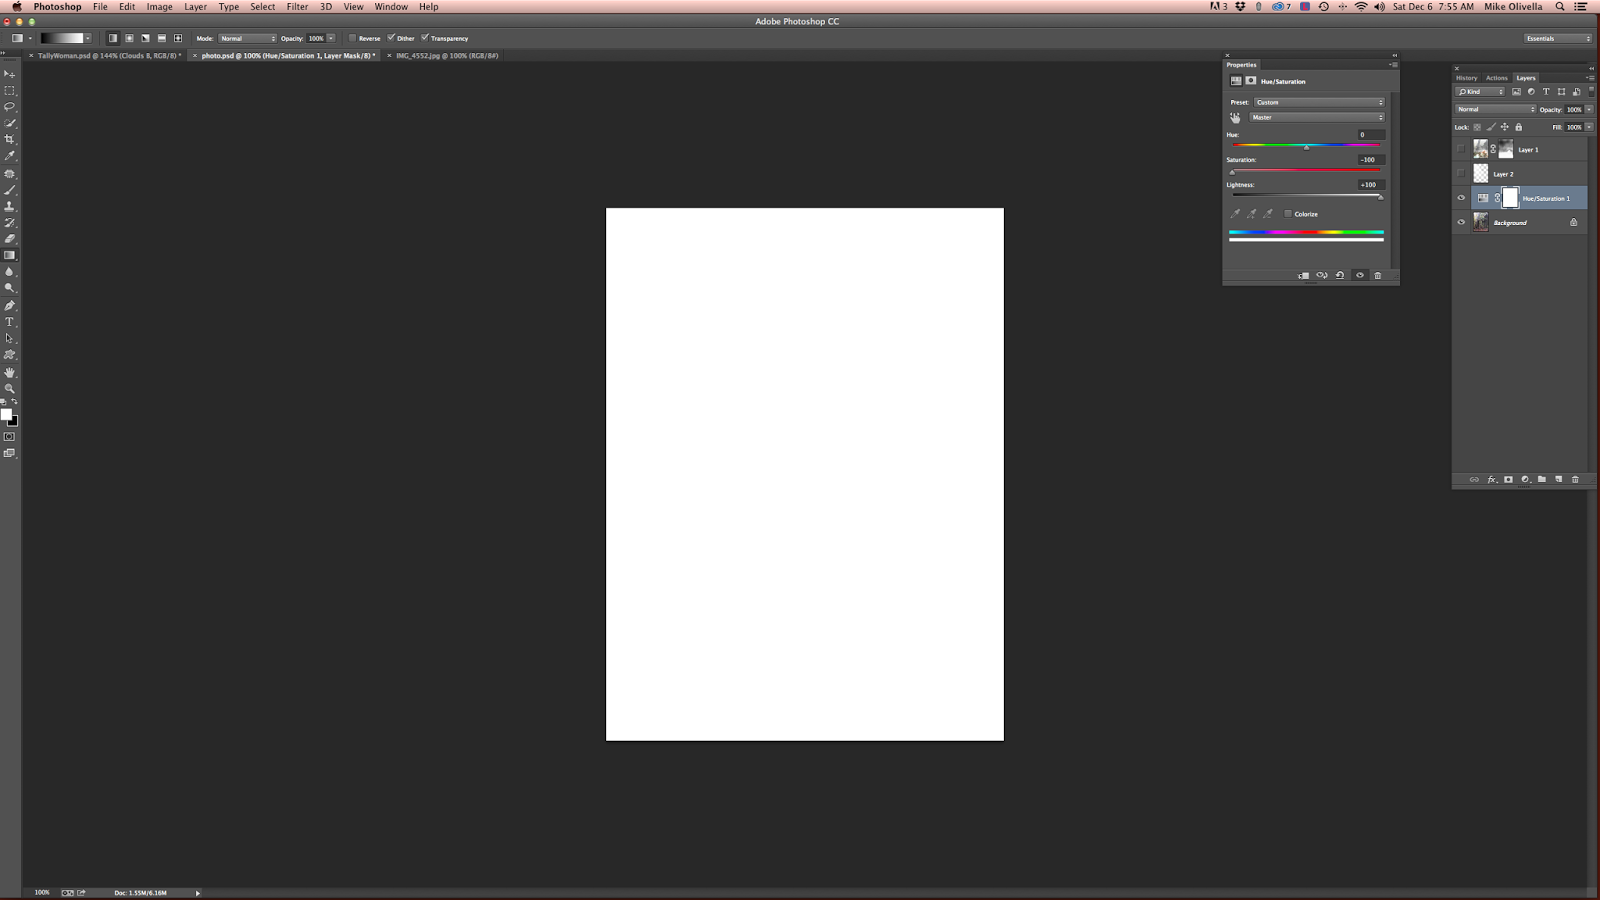
Create an adjustment layer in the image
Select Hue/Saturation
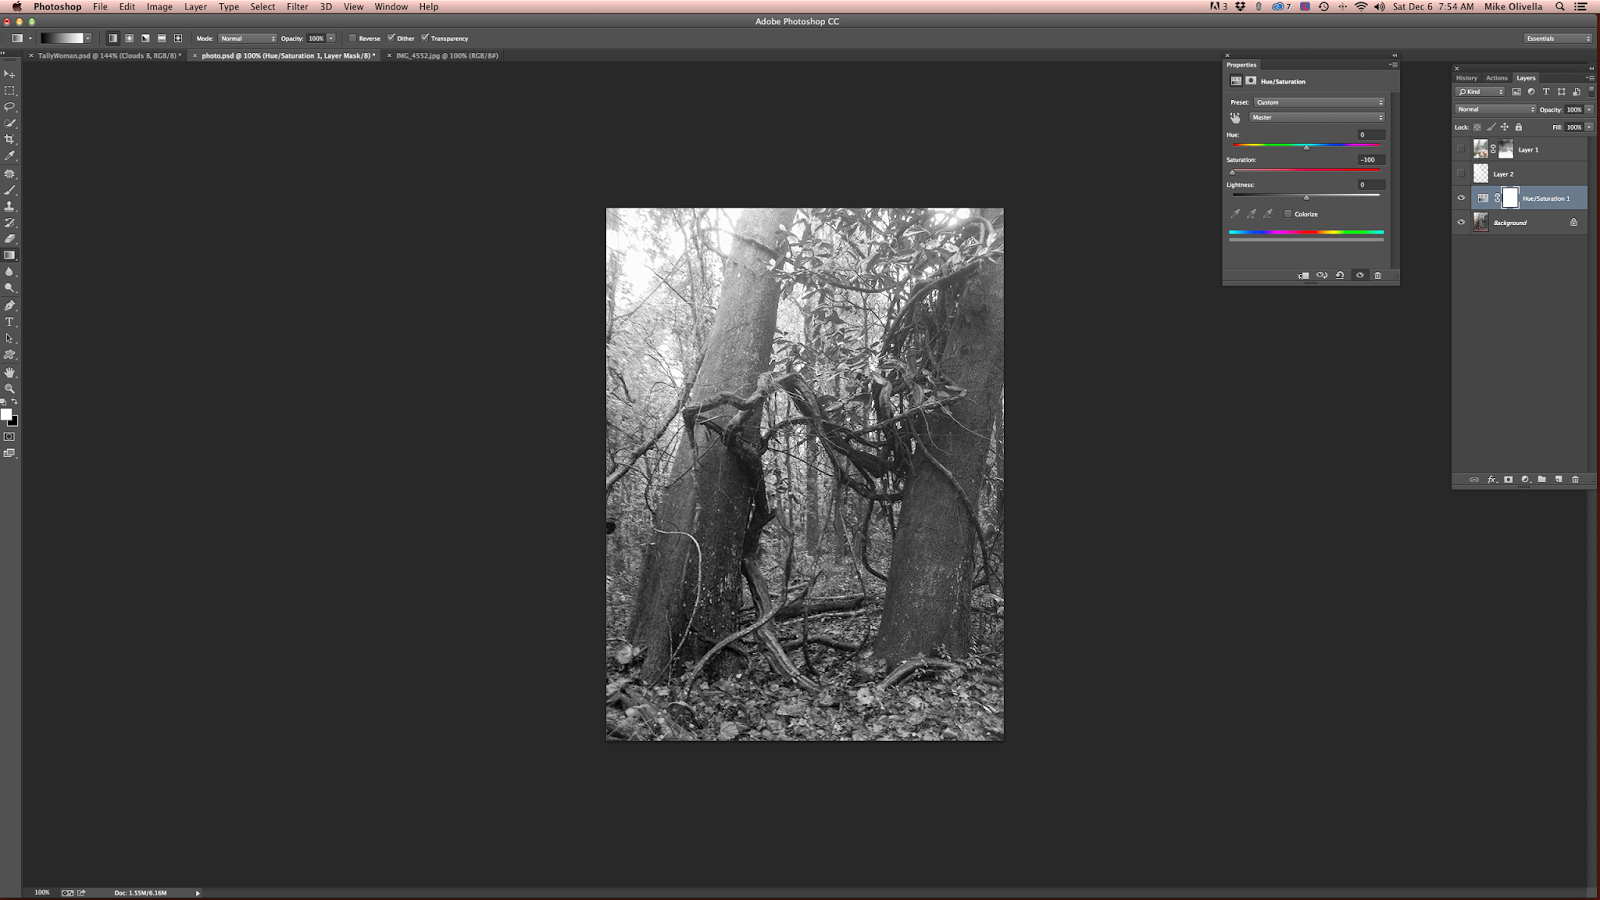
Reduce the Saturation to -100
Push the Lightness to +100 
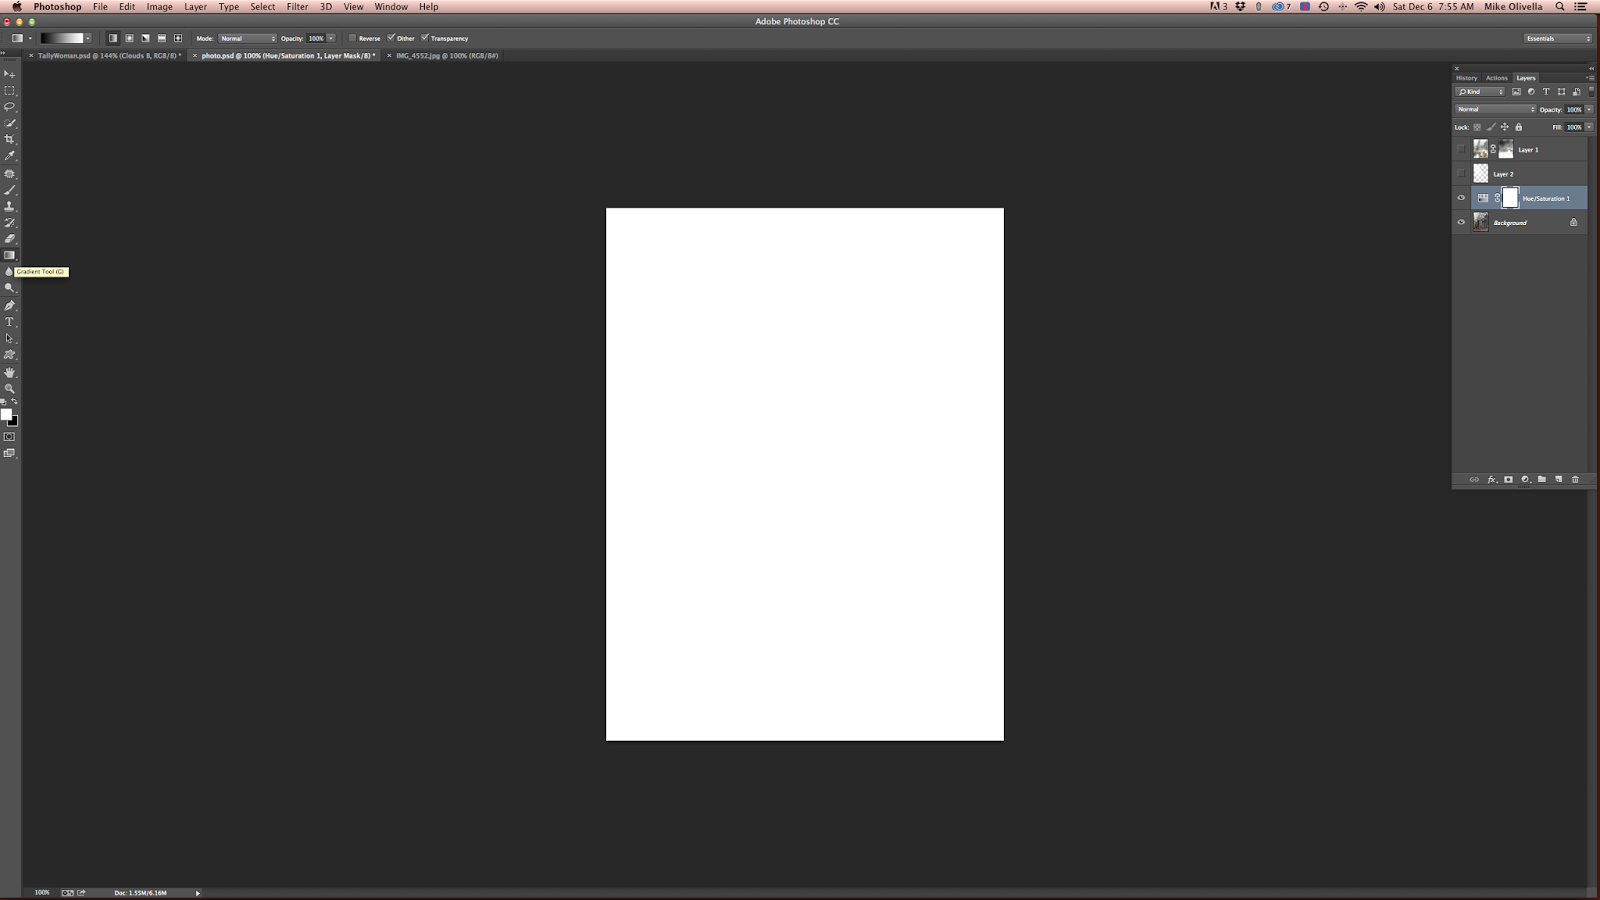
Click on the Gradient Tool and make sure you're using the Linear Gradient feature (first box on the left at the top)
Make sure you are using the Black/White gradient feature (3rd from left)
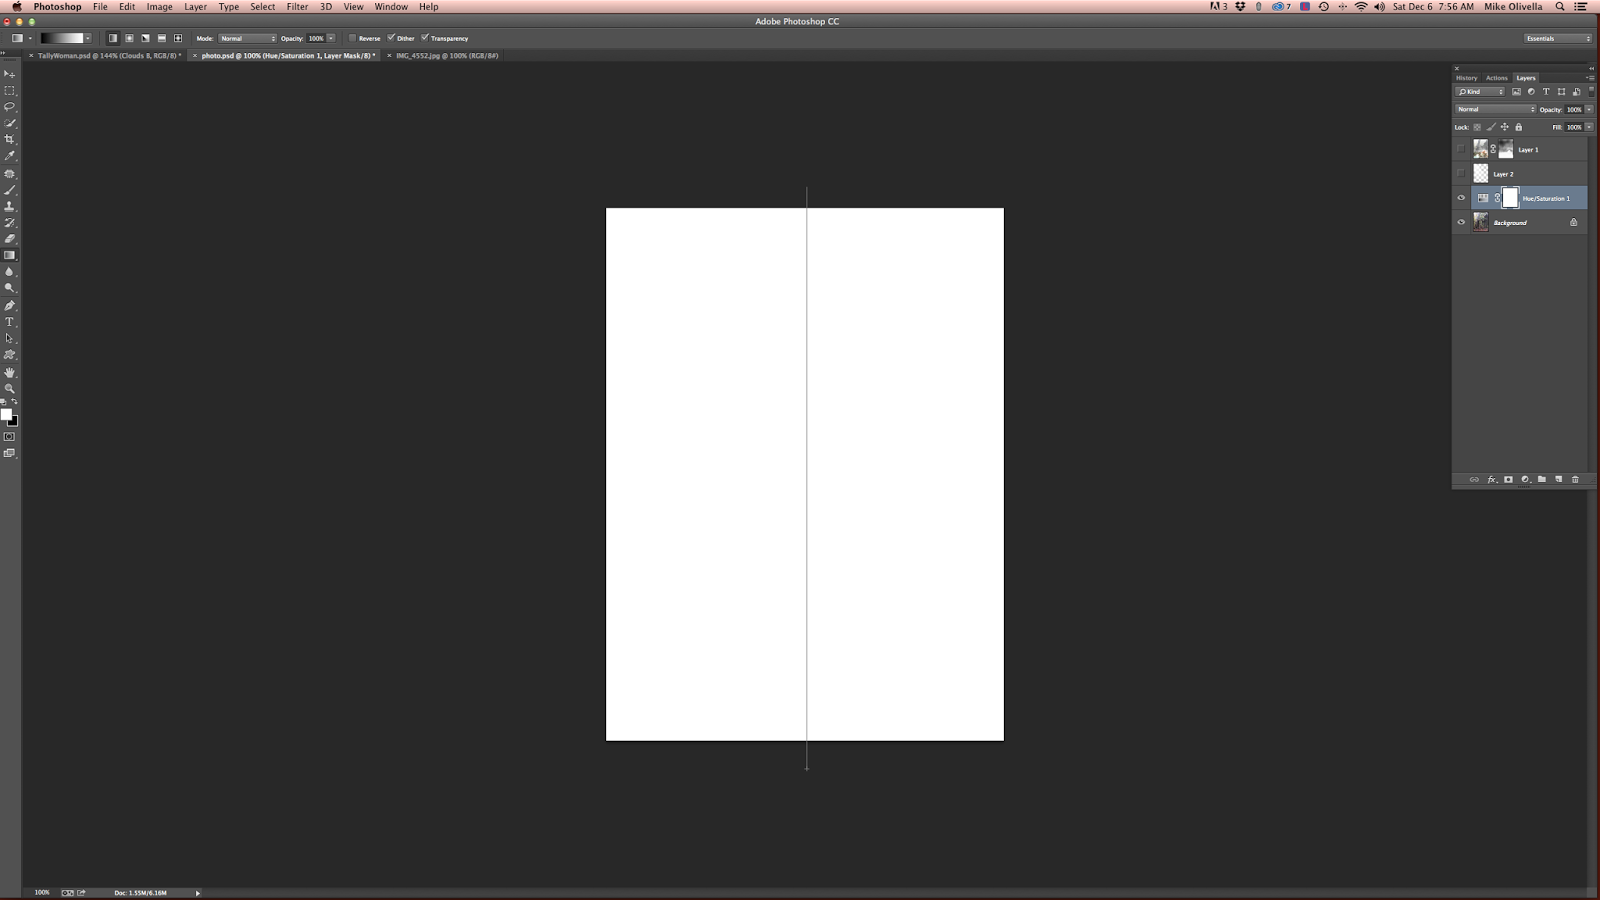
Move your cursor under the center of the image, right click and move the cursor straight up to just beyond the top of the image. This will create what looks like a thin black line in the center of the image. Release the mouse button.
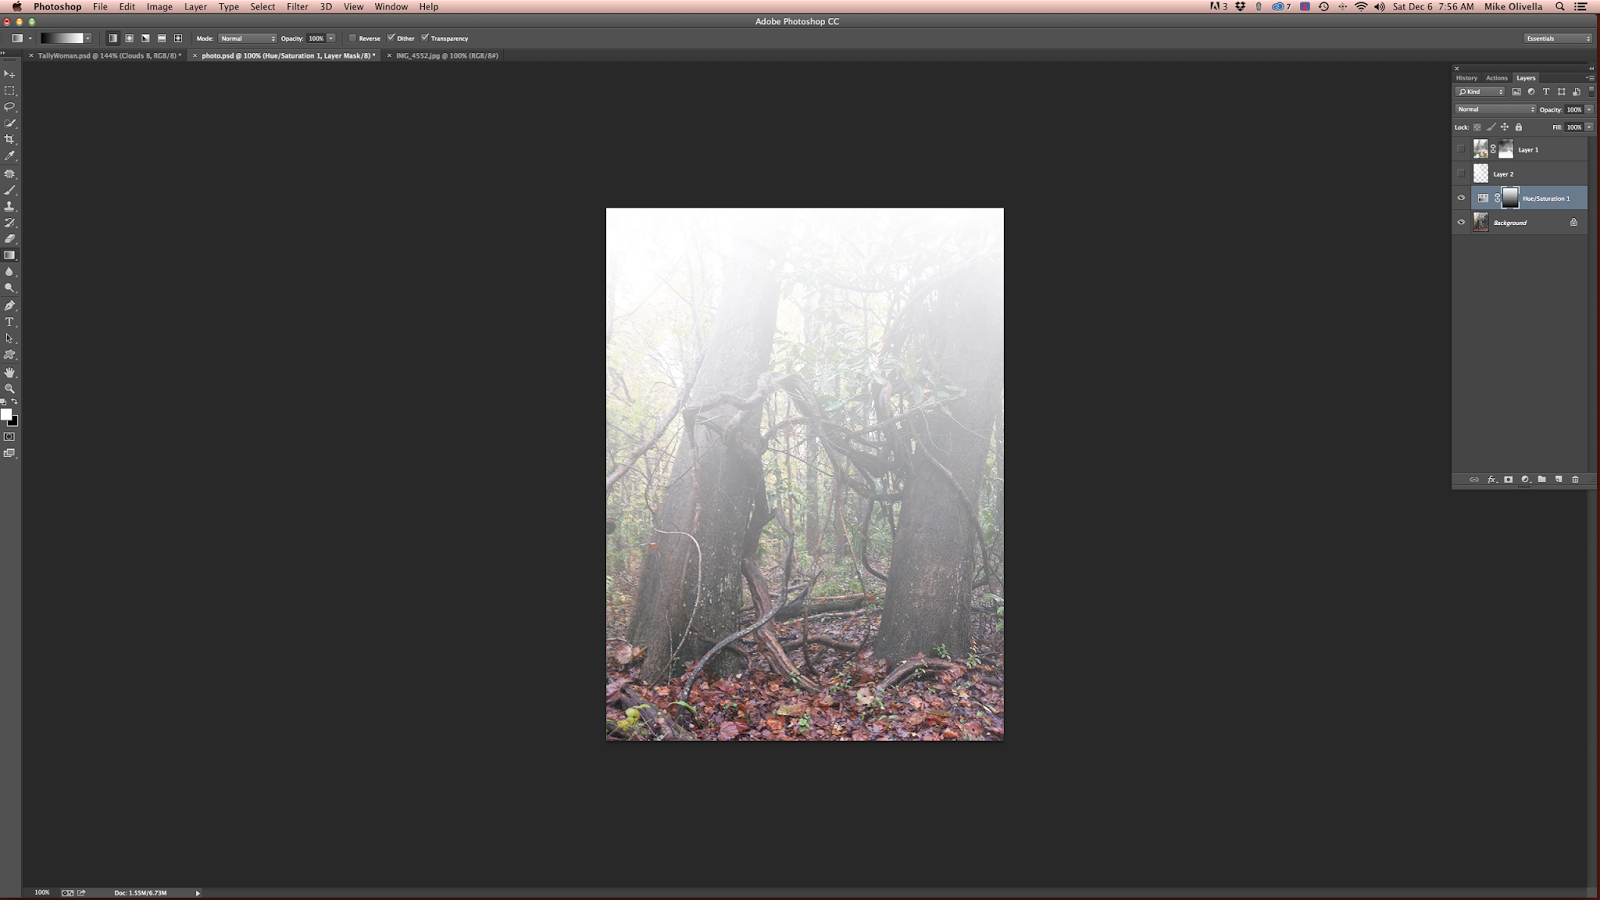
When you release the mouse button, this is what you'll see….instant, gradual haze. Adjust the layer opacity to taste.
In the image below, I've reduced the opacity of the haze adjustment layer to 65% and brought the model back in to the image to show you how nicely the fake haze is beginning to blend in with the white feathered haze I left around her head when I did her cutout.


OK, Step 4 - creating ground fog around the model and the couch so she will look a little more natural in the setting.

Create a New Layer in the background image (use the Create New Layer icon in the Layers palette or go to the top of the PS Menu, click on"Layer", then "New", then "Layer", then "OK". 
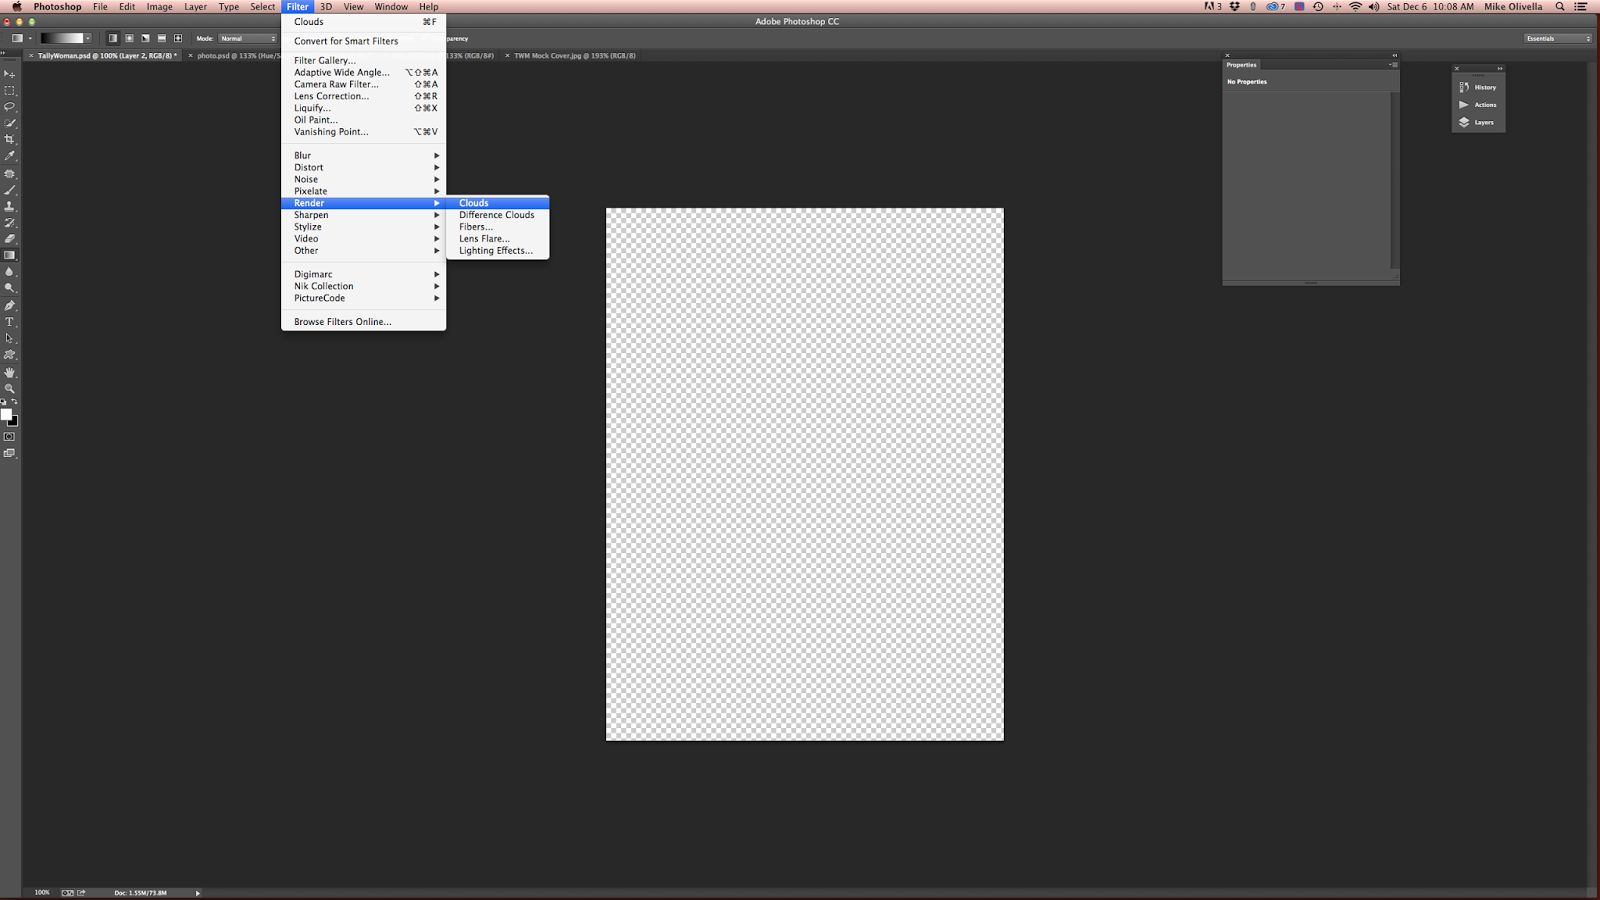
Click on "Filter" and from the drop down menu select "Render" and then "Clouds"
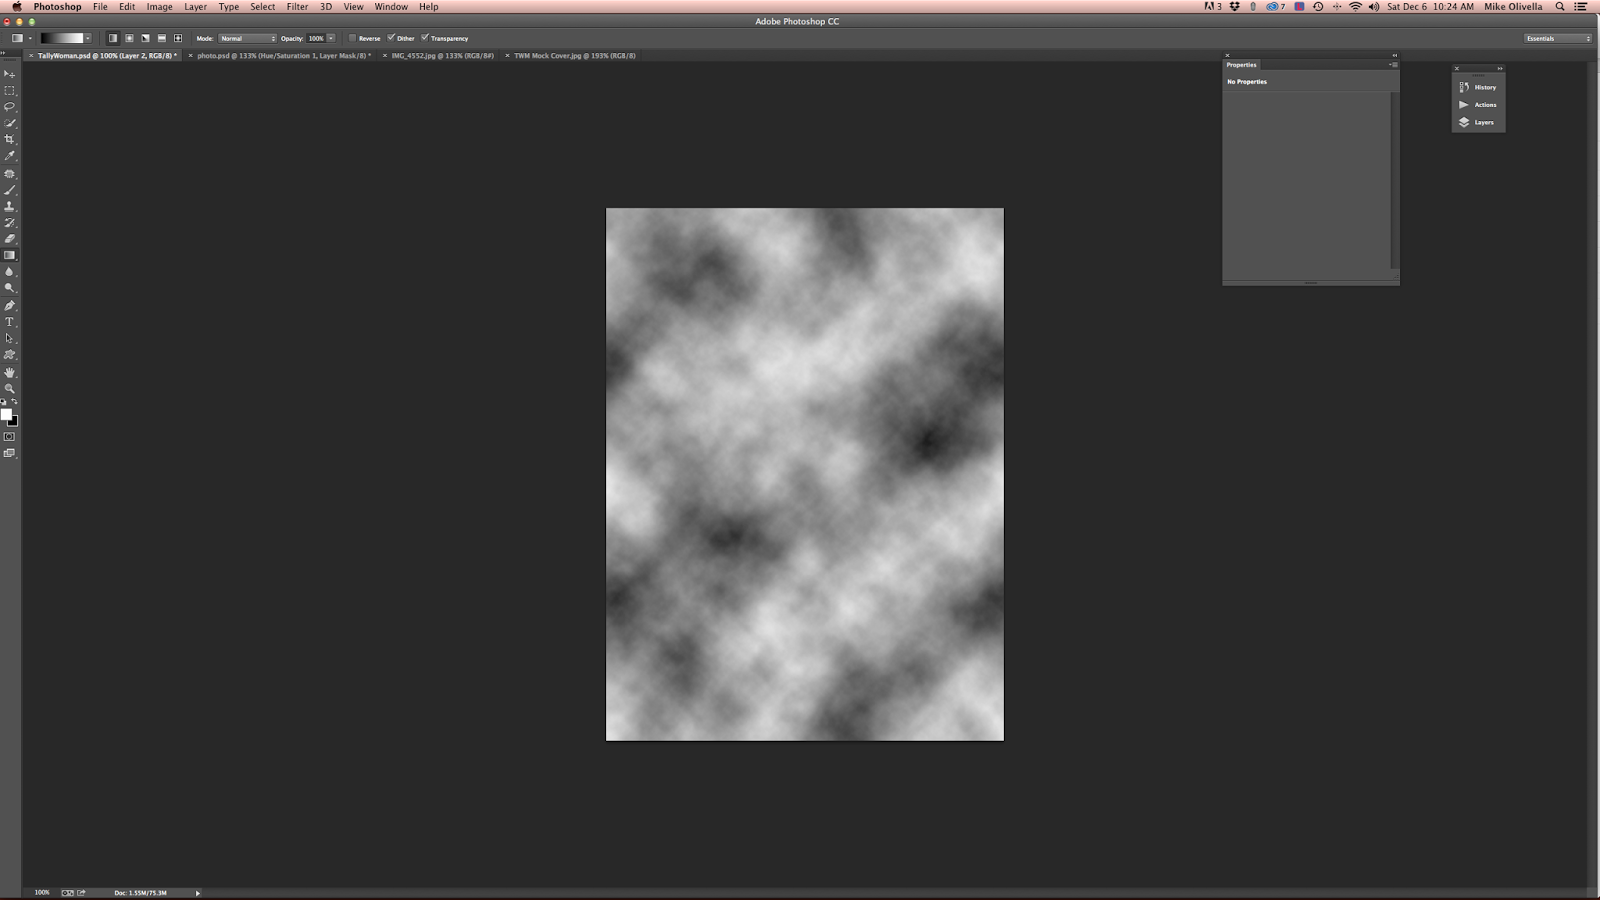
Don't freak out when you see what you get, but this is what it will look like at first
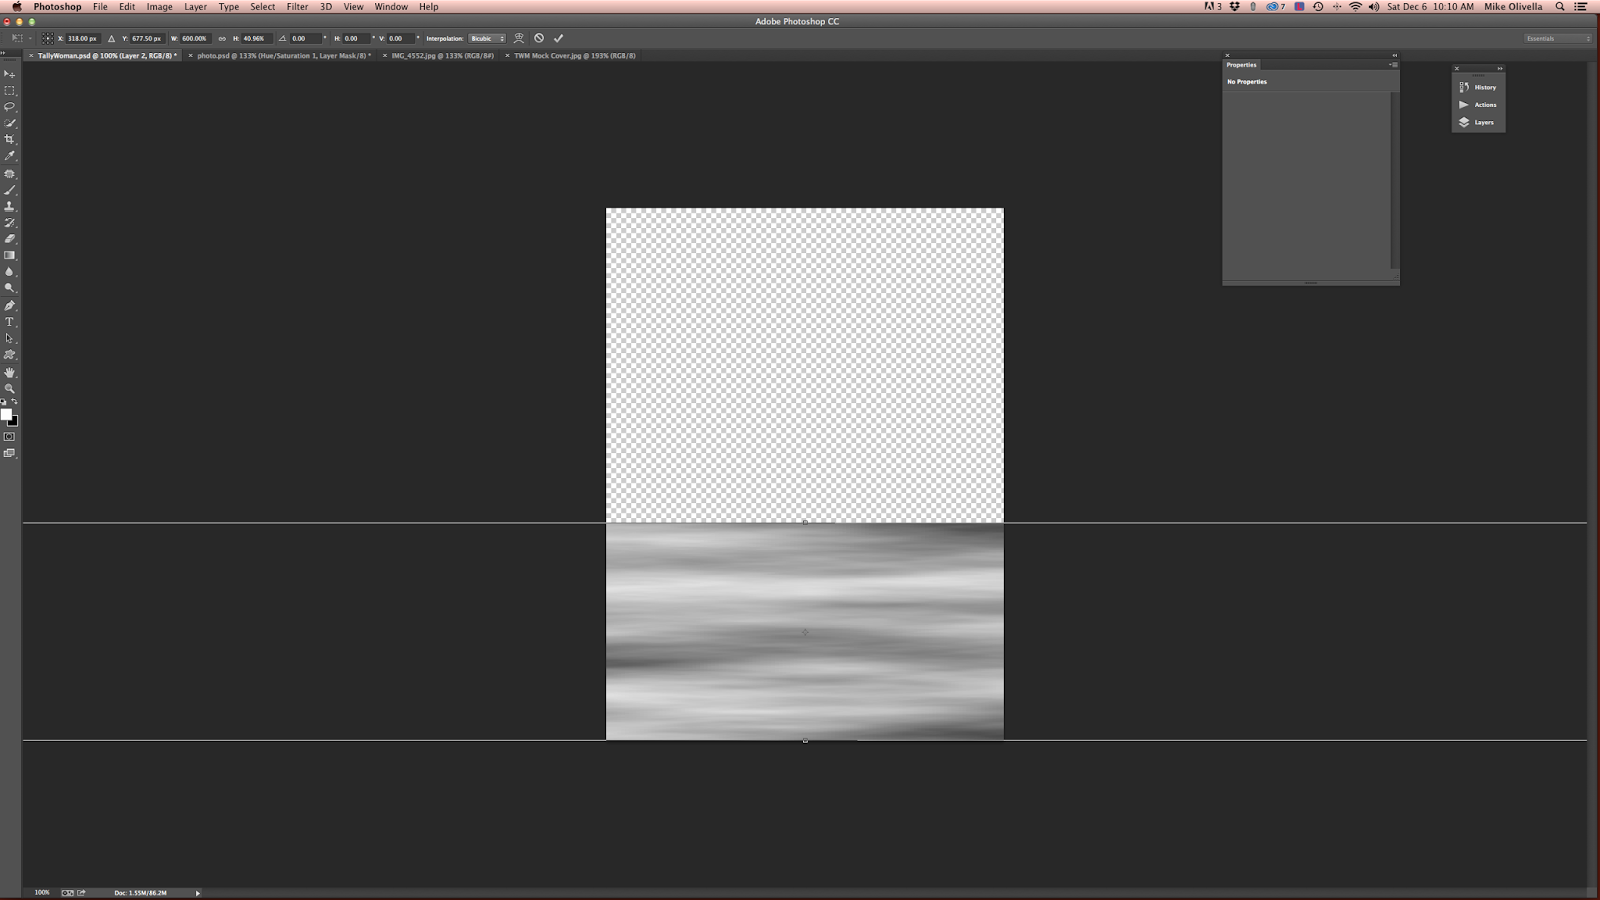
Click on "Edit" in the PS Menu and select "Free Transform" Change the width to 600% from 100%. Looks a lot better, huh?
Using the cursor at the top, click on the little box and move the top line down and reduce the clouds by about 2/3 of the image size. Adjust the Opacity to taste and brush out any areas you don't want. In my image, I brushed out some areas around the model's face and body with a large brush set to an opacity of 10% and a hardness of "0".
After I finished with the cloud layer, I created three more of these layers and blended them in to the first layer with different opacity settings so as to have the fog dissipate from the front of the image towards the back of the image while also selectively brushing out portions here and there (Below).


Step 5 was to add beams of light originating at the top left of the image and cascading down onto the model as if sunbeams were peering through the trees and falling onto her. This was probably the simplest step in the entire process but I think it's what really makes the image pop. Ordinarily, it would have been an excruciating Photoshop process but thanks to UK photographer Gavin Hoey, you won't believe how easy it is to do it.
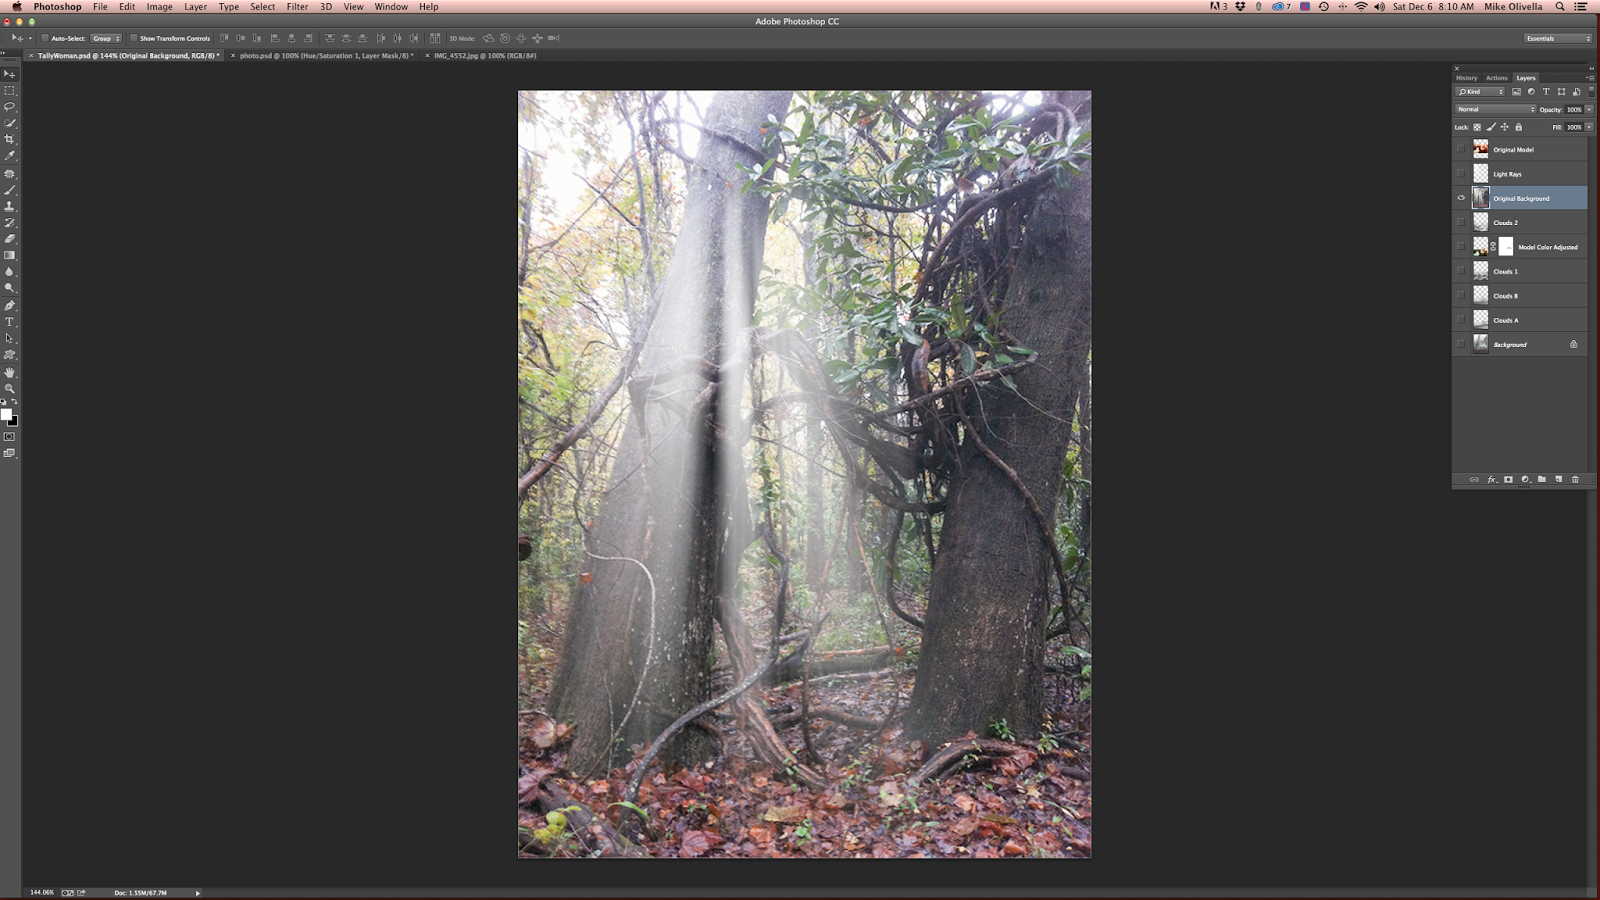
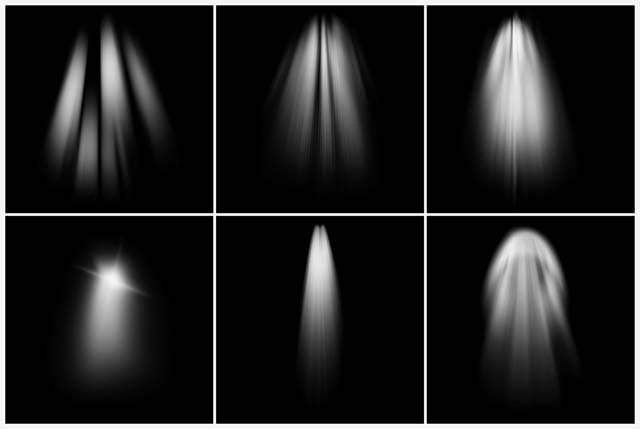
Gavin's Light Beam brushes depicting their various effects
Go to Gavin's web site (http://www.gavtrain.com/?p=2802) and download his light beam brushes which will create the light beams shown above with one click of the mouse! After you download the brushes, you'll have to unzip the file and install the brushes into your brush tool. Once that's done, here's how I applied one of his brushes to my image.

I selected the brush I liked best for the setting and adjusted the brush size to fit the image
I clicked the cursor inside the image. Voila - light beams.
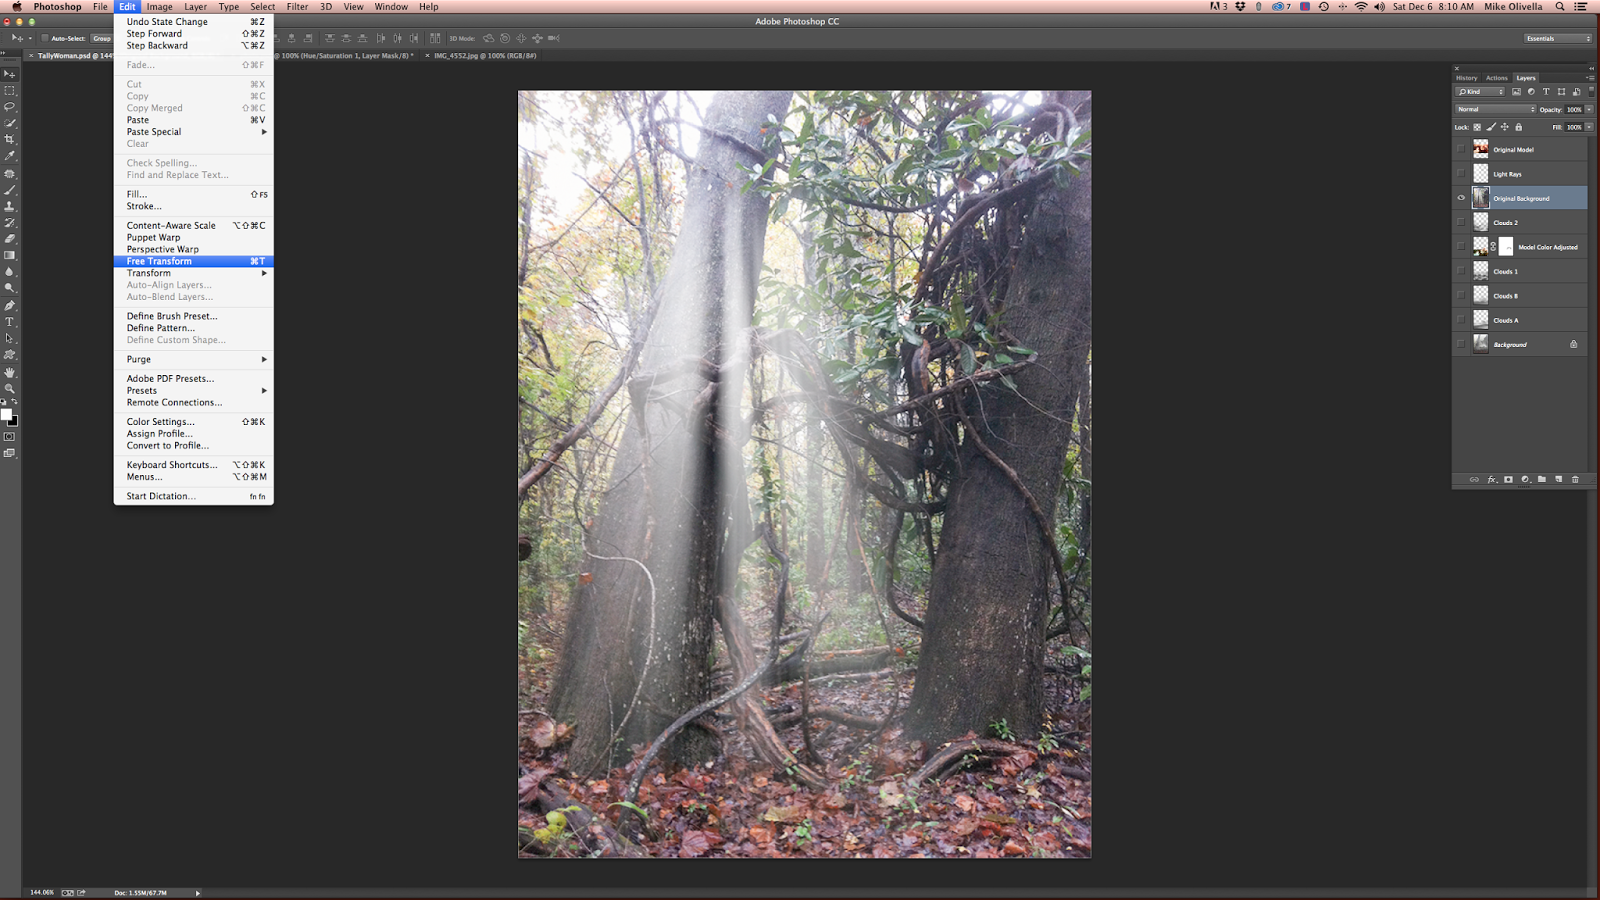
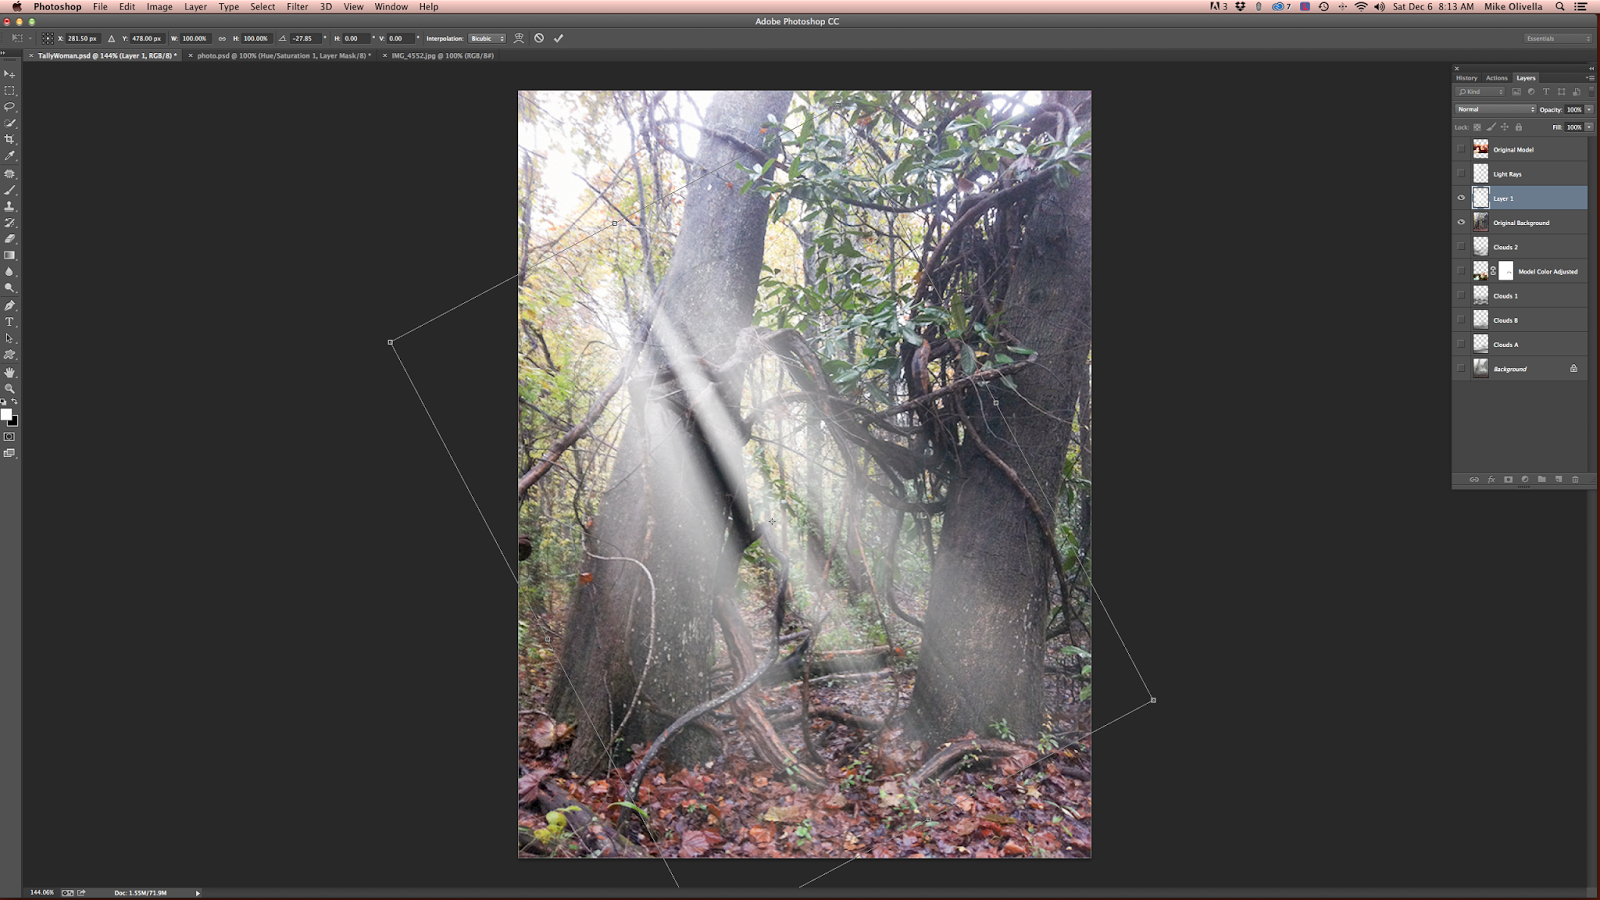
I opened Free Transform from the Edit Menu 
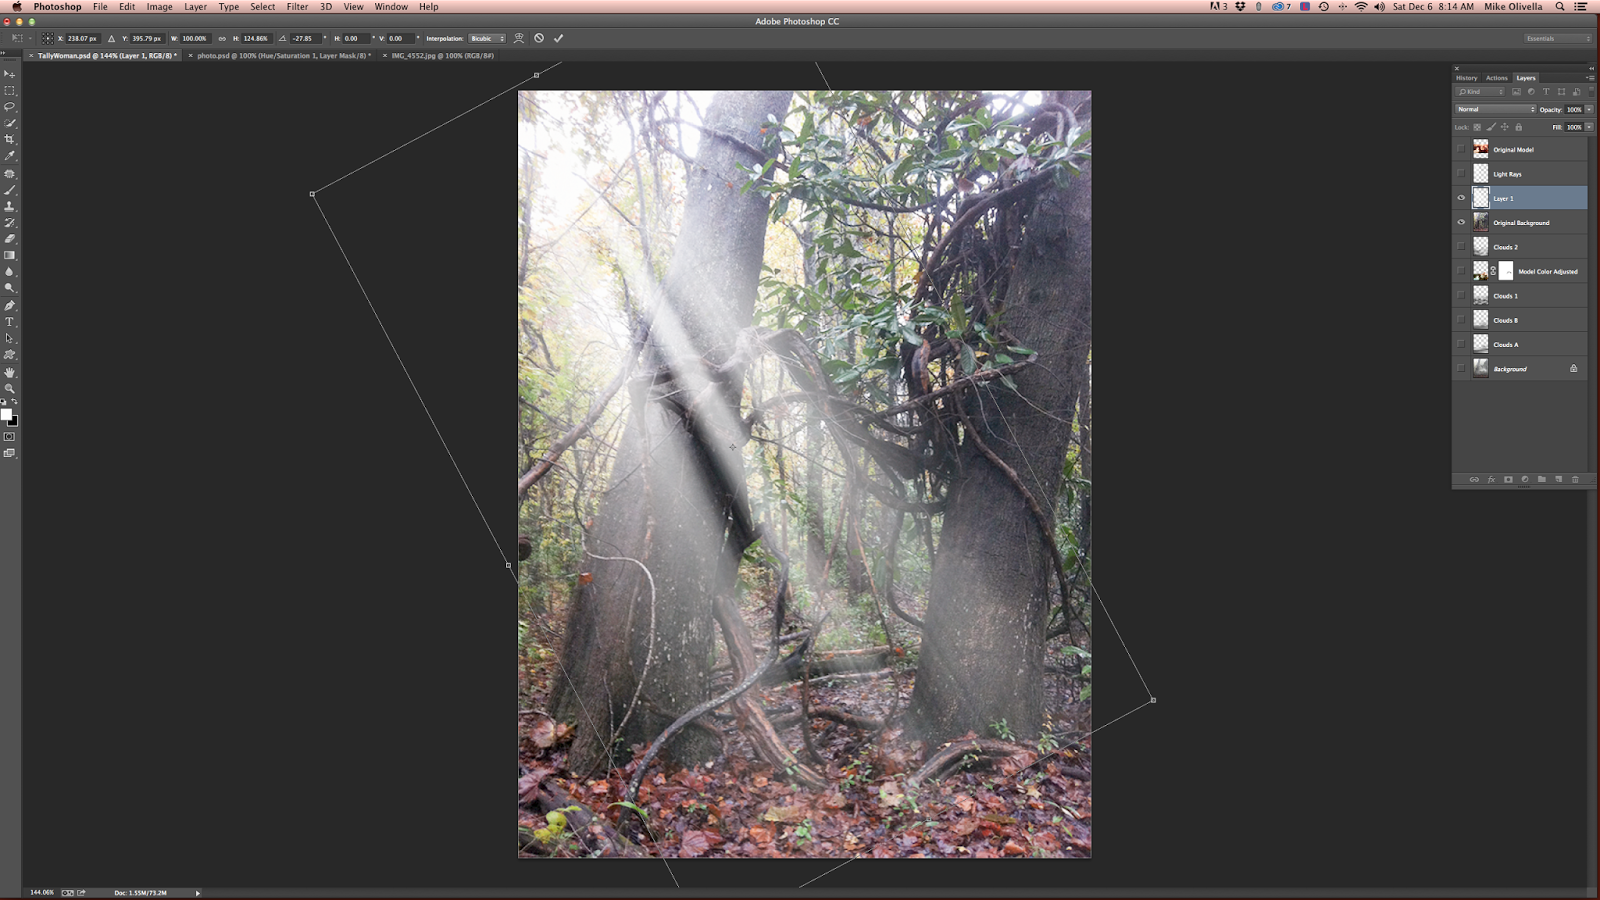
I rotated the light beams so they would angle down from top left to bottom right
I increased the size of the beams
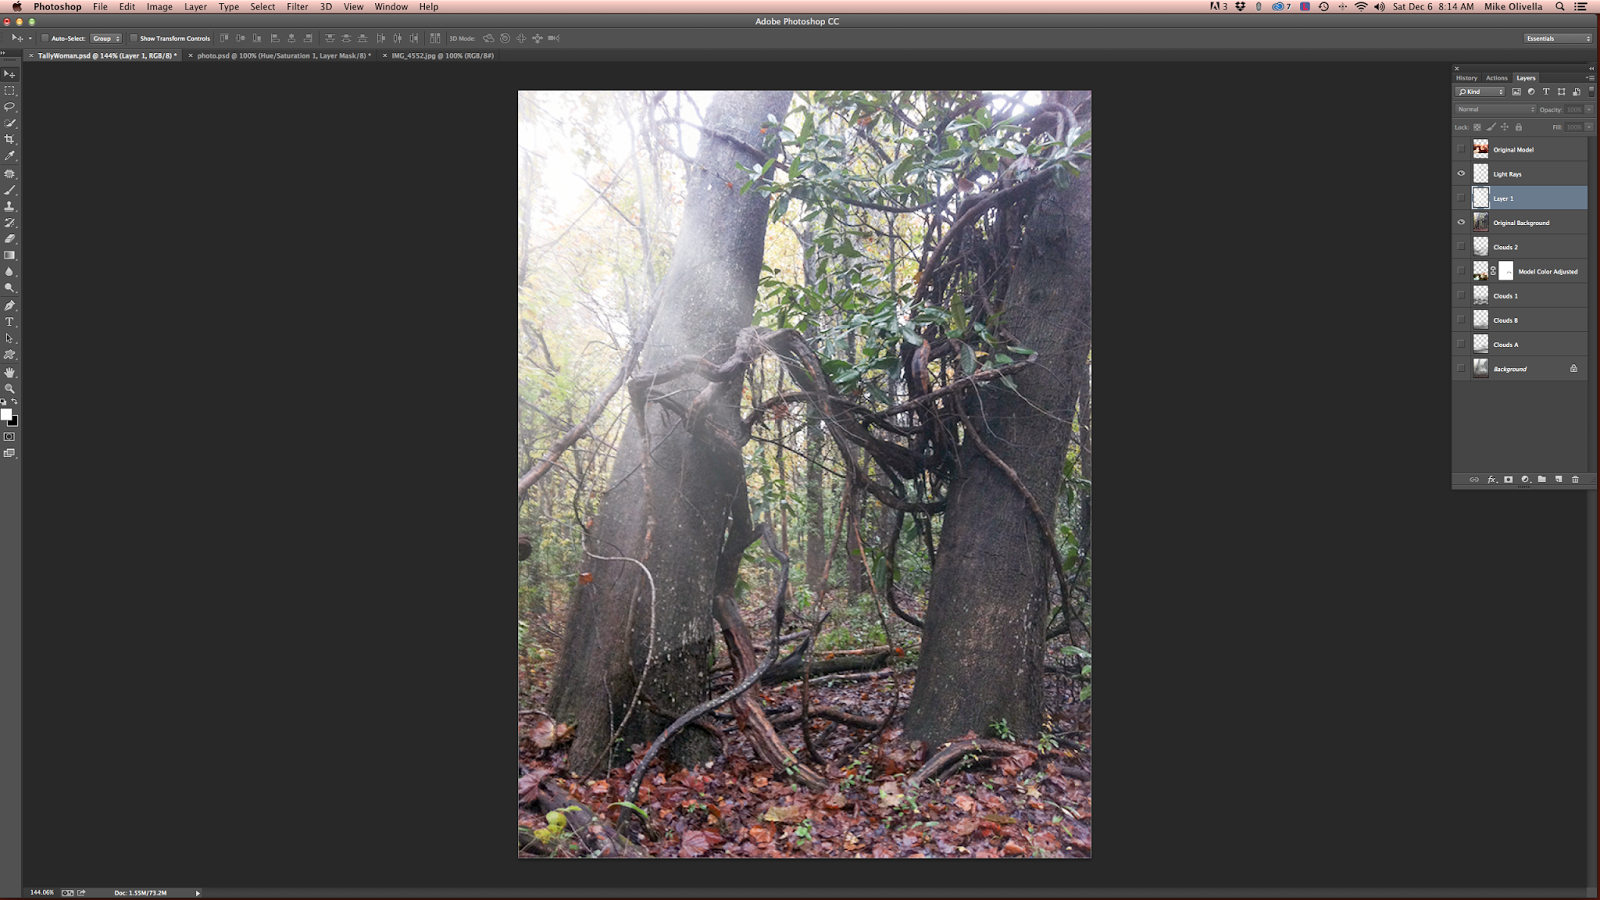
Badda boom, badda bing - light beams after reducing the opacity
With the clouds, haze & model's layers brought back in
The final steps in the process included playing with all the layers, tweaking their opacity, brushing in and brushing out bits and pieces, and running the model's image through OnOne's Perfect Effects to add some flair. I then flattened the layers and did some additional tweaking of the overall image with the Camera Raw filter adjusting the overall highlights, shadows, color and contrast. Finally, I added the magazine's mast head and ended up with…..

When I do the actual shoot, I will be trying different poses, playing with the lighting as I set up my  lights with different light modifiers, and I'll be using fog machines to minimize having to create same in post (unless the wind doesn't cooperate). The shoot is set for this coming Friday, so fingers crossed it goes as planned.