Showing posts with label equipment. Show all posts

Monday, July 25, 2016

Photo Gear I am Packing For Trips Abroad


Travel photography is something I thoroughly enjoy, and to me, foreign countries are fascinating from a photography standpoint. My fascination probably has a lot to do with having a chance to see things I don't ordinarily see in the U.S. I live in a relatively small town and I don't have the chance to wander around large cities with nothing to do but snap photos of anything that catches my eye. But when I travel abroad with my family, it's always to large cities with museums, cathedrals, old buildings, and lots of people. I end up with thousands of images simply by walking around with the family on our daily treks from cathedrals to palaces to museums to our apartment.

Deciding what photo gear to take with me when we travel abroad is always a dilemma for me. As I try to pick among camera bodies and lenses I have to keep reminding myself that I simply can't take everything that might conceivably come in handy for one thing or another. So, it becomes a delicate balancing act between packing what I know will get a lot of use as opposed to what might get a little useI would like to take, making sure the final selection will take a manageable amount of room in my carry-on bag.


So what do I take in the way of gear? In a perfect world with no limitations I'd love to grab my 400mm f2.8 prime lens, my 80-200mm f2.8 lens, my 17-35mm f2.8 wide angle, 15mm f2.8 fisheye, a 1.4X Teleconverter, and my 35-70mm f2.8 lens. I'd grab a couple of D3S camera bodies and my D800E, batteries, chargers, and load everything up in a roll aboard. But I can't get all this stuff into a bag that I can carry onto all planes and I refuse to check my photo gear, especially for international travel. So, I have to walk the tightrope and pick gear that will take as little space as possible. Here's my compromise.


This is my new best friend. It's a Mountainsmith camera case. It will fit inside any airline approved carry on bag, backpack, or messenger bag with room to spare. If Regional jets are in the cards, I can carry it on all by itself and it will easily fit in the overhead compartment of even the smallest Regional jet. The bag is a mere 14" wide, 11" tall, and 6" deep and comes with a bunch of velcro dividers, but more often than not I don't use them as they just take up space.


As a test for our upcoming trips I spent some time scrutinizing what gear I really, really wanted to take. I then set out to see if I could get all of it into this case. Success. Everything that I know I will use fits perfectly inside the case.


Here's what's included, starting at the top and working my way from left to right:
  1. Three camera straps, each with dog leash-style attachment clasps that attach to the camera bodies with Black Rapid fasteners screwed into the tripod threads - easy way to clip the cameras on and off when not in use
  2. 18-200mm f3.5-5.6 lens for the D800E - if I'm heading out with one camera/lens and size is not an issue, this is usually my choice - low noise, great zoom range for walking around and shooting people and things without having to get close, plus wide angle coverage for landscapes, etc.
  3. 70-300mm f4.5-5.6 lens - for both the D800E and either mirrorless camera body - longer reach than the 18-200mm and when used with the mirrorless bodies it becomes a 189-810mm monster but easily carried in a bag.
  4. 35-70mm f2.8 lens for the D800E - if I'm heading out in the evenings when light will be low, a good all around, small lens for the D800E
  5. Nikon D800E camera body with battery pack - for those 36 Megapixel landscape shots or super low light images where noise might be an issue
  6. 15mm f2.8 fisheye - one shot, super wide angle images inside cathedrals, palaces, etc. with the added uniqueness of the curvature the lens creates. That can be easily removed in post processing if I want a more conventional wide angle look
  7. 30-110 f3.8-5.6 Nikon1 lens - 81-297mm equivalent on either mirrorless body makes this a great alternative to the D800E/70-300mm combo while fitting in a jacket pocket
  8. Dust bulb/brush & cloth
  9. Battery charger for the D800E batteries
  10. 10-30mm f3.5-5.6 Nikon1 lens - 27-81mm equivalent on either mirrorless body makes a great alternative to the D800E/35-70mm combo while fitting in my pants pocket
  11. 10mm f2.8 Nikon1 lens - 27mm equivalent for either mirrorless body, a great alternative to the D800E/15mm fisheye inside cathedrals, palaces, etc. while fitting in my shirt pocket
  12. Nikon1 V3 and Nikon1 V2 camera bodies - small, mirrorless bodies that can be set to silent mode so no one knows you're shooting pictures, 50 frame/sec capability, 18.4 & 14.2 Megapixels respectively, and a whopping 2.7X crop factor for lenses
  13. Battery chargers for the Nikon1 V2 & V3
  14. Tenba Toolbox 8 case for the mirrorless gear
  15. Lens converters for the Nikon1 V2 & V3 which allows any Nikon lens to attach to the mirrorless bodies
Spare camera batteries, cards, and camera manuals are stored in the Tenba Toolbox and in the lid of the Mountainsmith case.

If I decide to do the minimalist thing and pack all my photo gear into one carry on bag that includes my laptop, passport, tickets, reading material, etc., then this is what I've decided to do.


I can simply reconfigure the Tenba Toolbox a bit, add the 70-300mm, and have a pretty comprehensive amount of gear ranging from the equivalent of a 27mm f2.8 lens for low light and wide angle shots to what is effectively a 200-800mm long zoom. If I take both camera bodies with me on any given day I can have one set up for wide angle shots and the other for zoom shots. Both cameras will easily fit in jacket pockets or a small bag and there's nothing I can't shoot. Admittedly I don't get the same  image quality as with my D800E but after experimenting with this setup in Spain last year I was pleasantly surprised - the cameras/lenses do remarkably well and are a lot easier to carry around.

For example, we went to the bullfights one night in Madrid. I was able to take a variety of shots, including wide angle ones to capture the pageantry of the event, mid zoom shots, and good, tight action shots, all with camera gear that fit in a very small, inconspicuous bag. That included the equivalent of 800mm focal length shots that were handheld, using the VR feature of the 70-300mm lens to help me with image stabilization.


The Nikon1's also did pretty well when just walking around Madrid and Barcelona taking a variety of shots, from indoor low light images to people images to scenery. The VR feature included in all the Nikon1 lenses made low light photography a snap, and when the necessary shutter speed was too slow for VR to make an image possible, I used some of my typical tricks to avoid camera shake (resting the camera on a column, chair, the floor, etc.)


I'll be shaking off the travel photography rust off with a long weekend in Montreal later this summer. That will give me another chance to put this gear through its paces before another jaunt across the pond. Hopefully someday technology will take us to the point where the small mirrorless bodies will rival the image quality of the large DSLR's. Unless the Montreal trip gives me any reason to question the results from Spain, I hope to be satisfied with what I've settled on while at the same time avoiding the nightmare of  lugging around a ton of gear.

Friday, June 26, 2015

I'm Not Mac'ing This Up


What would you say if I told you I picked up a new-used 20" iMac, refurbished by Apple certified technicians, for the whopping sum of $259.00 plus sales tax (because I live in Florida) and $35 for shipping (because I didn't want to drive to Tampa to pick it up)? It may be a mid 2007 model but this bad boy has a lot of life left in it and will be just the ticket to replace an old, tired Windows XP PC at our cabin in North Georgia.

Every time we have headed up for down time at our cabin, we've powered up the PC and lived with its slooooow internet capability and Photoshop PS2. It got to the point where everyone took their laptops with them because using the PC was just not worth the trouble. No more. We now have an inordinately functional desktop that will serve our purpose and then some; and its a Mac.

The specs on the $259 iMac
I chose this particular iMac because it was upgradeable to 6MB RAM (it came with 2MB RAM) and I had some spare RAM memory laying around after I upped the memory a couple of years ago on my home based iMac. 6MB of RAM is more than enough to run Photoshop CC smoothly and handle an operating system upgrade from Mountain Lion to Yosemite.  For $259.00 it was light years better than any PC I could have gotten.

Mac of All Trades web site
$20 Off Banner that rotates with other banners
I normally don't sing the praises of any particular vendor but I break this rule when a vendor comes along that offers great products at great prices, provides prompt shipping, and most of all sells me exactly what I bargained for. Mac of All Trades is everything I hoped for and a bag of chips, and its  where I found my new-used iMac. I stumbled across their web site a few days ago and began looking through its offerings. When I saw the $279.00 price on the 2007 iMac, I was seriously considering pulling the trigger on it. When the web site banner changed and I saw that I could get $20 off simply by being a new customer and signing up for their newsletter, so much the better. I used a catch-all Yahoo! email address I have just for stuff like that, signed up, got my email from them to verify the address, and in a couple of minutes the price dropped to $259.00.

Some of the iMac offerings
A few of the 15" Macbook Pro offerings
Some of the 13" Macbook Pro offerings
I've posted some examples of the Macs available from Mac of All Trades above. They pretty much have every Mac you could possibly want, including  all manner of Macbook Pros, Macbook Airs, Mac Minis, iMacs, and towers. In the way of Mac accessories, they carry most everything like keyboards, mice, and displays ranging from 20" to 27". Need an iPad or an iPhone? They have those too. All products come with a 90-day warranty but you can purchase extended warranties of 1 and 2 years.

Some of the Deals of the Day
If you decide to pay Mac of All Trades a visit, don't forget to check out their Deals of the Day page for additional savings. Had I needed a Macbook Pro, I could have bought a 13" Mid 2009 model for $229.00. That's a lot of laptop for $229.00.

So, if you're looking for any kind of Mac and you'd rather not cough up the big bucks, you may want to check out Mac of All Trades.

Friday, June 12, 2015

Multiple Exposures Exposed


At the end of every baseball season, I receive a number of emails and Facebook messages from folks asking me how I create the multiple exposure images I post on line. It's no coincidence that these questions are posed after baseball season. I always seem to shoot multiple exposures during  baseball games and so those are the ones folks see. 

Why baseball? Hmmmmmm. Maybe it's because games last several hours and there's a lot of down time in between the action. Also, after the first few innings of a game I've usually gotten all of the basic shots out of the way - hitters swinging at balls, fielders making plays, et cetera. With several innings left in a game, the only shots to get are of big plays that might change the outcome of the game. So, with a lot of time on my hands I find myself experimenting with my cameras. 

Baseball also lends itself to some multiple exposures as generally speaking the subjects remain within the frame throughout the several exposures needed to create an image. But rather than ponder on the meaning of life, let's chat about how it's done. A little background is in order before delving into the nuts and bolts.

The Good Old Days…Well, Maybe Not So Good….
I've been shooting multiple exposures for a loooooonnnnng time. Believe it or not, there was a time when images were created with something called film, a plastic strip that was coated with a gelatin emulsion that was light sensitive. Housed securely inside the bowels of a camera, images were recorded by the shutter allowing light to pass through the lens and onto the emulsion. Many of my old film bodies had a feature that allowed you to shoot as many images as you wanted to on the same film frame. I would set the film rewind button (normally used to rewind the film back into the canister after shooting up a roll) to the rewind position, push the film advance lever forward as I normally would after snapping an image, and presto - the shutter was reset and ready to take anther image. Because I had set the camera to film rewind, the film would not advance. Pressing the shutter again would therefore record a second image on the same frame of film. This process could be repeated as many times as I wanted.

Unfortunately, you couldn't see what the image looked like until the film was processed, so shooting multiple exposures with film involved a lot of trial and error and a good dose of hope and prayer. I would shoot the same general image several times using different exposures hoping that one of the multiple images was exposed correctly. You see, when shooting multiple exposures, there is a necessary exposure balance that has to be achieved between acceptably exposing each of the multiple images while not overexposing the overall image.  Repeated images on the same frame of film meant letting more and more light hit the film emulsion and we know what can happen when an image is exposed with too much light.

Two Methods For Creating Multiple Exposure Images 
Ah, but the Dark Ages have long since passed and we now have cameras with built in mini computers that do all this work for us. We also have software like Photoshop that allows us to create multiple exposures through layering multiple images on top of each other.

Yep, nowadays a multiple exposure image can be created using two methods - in the camera and in post processing. Which method you decide to use is up to you. You can let the camera do the work and create a multiple exposure image in the camera using its multiple exposure feature, or what I call the easy way. Option 2 is to shoot several images of the same subject in various poses and layer them into one image using Photoshop, or what I'll call the hard way but with much more final-image flexibility. The two methods definitely create different final images so which one you choose to employ will depend on how you want the final image to look and how much time you want to devote to creating it.

A brief caveat - Most Nikon DSLR camera bodies, especially all the ones I use (or have used) have a Multiple Exposure setting in the Shooting Menu. I can't speak for Canon or any other DSLR manufacturer's products. I have heard that until recently, Canon's digital DSLRs did not have a multiple exposure setting but that possibly some of the newest bodies do. If that's the case, you non-Nikonites may or may not have the option of generating multiple exposures in-camera and will be limited to Option 2. Nikon shooters, you're golden.

The Difference Between In-Camera and Post-Processing Multiple Exposure Images
In-camera multiple exposures have a dreamy, ghost-like quality that is difficult to overcome if it's not what one desires. If you want to minimize this you must spend some time in photoshop playing with layers, levels, curves, and contrast. 


The image above was an in-camera multiple exposure with some quality time spent minimizing the dreamy, ghostly quality. The pitcher is still a bit transparent, though, with a bit of the background visible through his body.

Here's a different in-camera multiple exposure without as much of that post processing or ghostly elimination.


Compare the two and you should be able to see what I'm trying to describe. The pitcher in the second image looks a little more dreamy or ghostly. He is much more transparent to the point where you can really see some of the background through his body. Not so much in the lead image, right?

Multiple exposures created in via Option 2, or in Photoshop, can also be made to have this same dreamy, ghost-like look by reducing the opacity of the various layers. But this "look" can be avoided by not reducing the opacity of the layers. With Photoshop, you also have the flexibility of reducing the opacity of some of the layers but not of others, creating a whole different look. 

The Photoshop Method
Let's take a look at a multiple exposure I created by layering several shots into a background and keeping each layer at 100% opacity, creating one final multiple exposure.


Even Tiger has gotten the Photoshop
Multiple Exposure treatment
As you can hopefully see, all of the layers have the same opacity as the background. No dreamy, ghost like quality exists as to the various players yielding a much more contrasty, final image. Basically, what I created is nothing more than a composite image using a background shot with multiple player shots (taken during various games throughout the season) layered onto the background. I chose images of players in poses that would mesh well with each other in the montage and in Photoshop, I followed these steps: 1) "selected" a player from an image using the select tool to cut the player out from its background; 2) created a layer with mask for the selection; 3) dragged that selection/layer into the background image as a separate layer: 4) repeated the process for every other player; 5) moved the selections (layers) around to get them to fit where they looked the way I wanted; 6) adjusted the size of each player via the "Free Transform" feature to proportionally size them and then refined that with some perspective adjustments using the "Transform - Perspective" feature; 7) processed each player layer separately for an even color balance, exposure and sharpness; 8) fine tuned each layer to remove any part of the selection that was outside the lines, so to speak; 9) flattened the layers; and 10) made final adjustments to overall tone, color, sharpness, et cetera of the flattened image.

Whew. It took me almost 20 hours of work to create the image because of the numerous player layers and my obsessive compulsive need to remove every last pixel that was outside each player's "lines".

The next two images illustrate the flexibility you have using the Photoshop method. These are also composites except all of the images were shot in one burst during the same game and during the same pitch. For each one, I used one image as not only an image of the player but also as the background for the final image. After that, creating the overall image followed the same recipe as the basketball image, i.e. selections and layers. Since there weren't as many layers to fine tune, the two baseball images "only" took 7-8 hours apiece to create.


What the two images above also illustrate is the flexibility of using the composite method. In the first image, I chose to reduce the opacity of all but one player image and removed all saturation in the others  to create a black and white backdrop. One image selection, the one I really wanted to stand out, was left at 100% opacity and full color. You can accomplish the same basic effect with an in-camera multiple exposure but it's not as easy. "Selecting" a player that is somewhat transparent is way more challenging so I've always used the composite method to achieve this effect.

Had I wanted to do create the same effect in the second image, only with all the player images in color, I could have easily reduced the opacity of all but one of the player images and left one at full opacity. I just chose not to do that.

The In-Camera Method
One day, when trying to find some God-only-knows feature on one of my camera bodies, I was scrolling through the menus and stumbled across a setting called ... yikes - Multiple Exposures. Huh? You mean I can avoid hours of eye-bleeding, monotonous Photoshop work to create a multiple exposure? No way.

Way. Once I found this little gem in the menu, I was able to navigate through the settings and experiment with them to create multiple exposures. It's beyond easy. It's a snap (actually, multiple snaps if you pardon the pun).


In case you have any trouble navigating through the menu, simply fall back to something that never fails - read the destruction manual. The camera manual for each Nikon body (above, p. 202 & 203 of the Nikon D3S manual) contains a detailed description on how to shoot multiple exposures. Follow the steps and holy moly guacamole....a multiple exposure.

Let me walk you through the various steps in setting the camera as I usually do.

Navigating Through The Menu


Step 1 - Go to the Shooting Menu and scroll down to Multiple Exposure. Use the Multi Selector (press on R side) to activate the next screen.


The default setting is "Off". Scroll up to "On (series)" and press the OK button.
Activate the number of shots selection by pressing on the R side of the Multi Selector. 
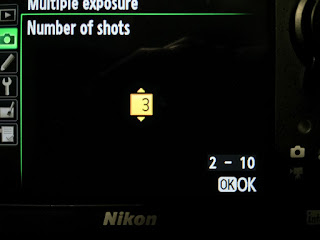
Using the Multi Selector, scroll up or down and choose a number between 2 and 10. I usually select 3. Press OK after deciding on the number of shots.
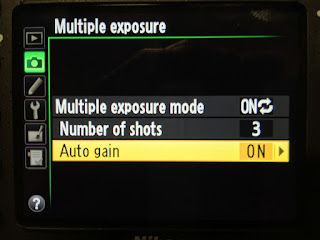
Pressing OK in the prior step takes you back to this menu. Make sure "Auto gain" is on or else you'll have to underexpose your images in order to avoid overexposing the overall image. General rule of thumb is underexposing the image by one stop for each image, so if you select 3 images, underexpose by 3 stops to start out and then adjust from there. I take my chances with Auto gain.
The last step is to simply hit the OK button and the Shooting Menu should pop back up showing that Multiple Exposure is on.


To get the best image, I would suggest you use a fixed platform from which to shoot, i.e. a tripod or a monopod, and try to avoid things or people that move in the background. A tripod works best but it's not impossible to get a decent multiple exposure with a monopod as I did in the images above and below. The reason for a stable platform that doesn't move and not having things that can move in the background is to give you a constant background in all of the exposures. If you notice in the image above, I was not able to keep the background constant. The players in the background are exposed in different poses from my movement of the monopod, their movement during the sequence, or both. Since I was shooting at f2.8 with very little depth of field, they're blurred, I don't think it's any big deal but you may want something more constant. If so, just use a tripod. But bear in mind that the background people may move during the sequence so even a tripod will not guarantee a constant background when people are in the mix.


As I mentioned previously, depending on how much contrast and adjustments you employ in final processing of the camera-made multiple exposure (through Photoshop adjustments like levels, curves, contrast, etc.) you can improve the amount of definition of the multiple-exposed subject has in the overall image and reduce the transparency. In the first image above (batter), I opted to go with a lot of definition so I made several adjustments that accomplished that. In the image directly above (pitcher), I went with a more artistic, softer overall effect so I did not use a lot of adjustments.

After experimentation with the camera, I've decided that for sports images, using a three-shot camera-made multiple exposure is just about right. I've tried more (5-7) and the images look too busy for my taste but you may find that you like additional exposures. As for actually shooting the images, I've used  the Continuous Low burst mode and set it to 5 frames per second as well as the single shot mode and pressed the shutter each time I wanted to freeze the subject. You can decide which way works best depending on how fast the subject is moving and go with what you see fit. Most of the time I'll push down on the shutter to initiate the multiple exposure when the pitcher (or batter) is set and then fire away as the throw/swing began. After 3 exposures, the camera knows it's all done and a quick peek on the back of the camera will show you the final, multiple-exposed product.

Some camera bodies will revert back to standard shooting mode after the sequence is finished so if you want to give it another go you must go back to the Menu and re-enable the Multiple Exposure mode.

Also, while shooting in Continuous mode, you don't have to hold the shutter down once you initiate the first exposure. You can release the shutter and re-engage it any time you want as long as you haven't shot all of the images in the sequence. You choose when you want each of the exposures to be recorded by pressing/releasing the shutter any time you want. For example, you could shoot one frame when the batter steps to the plate, wait until he's set and then fire the rest of the frames as he swings; or you could fire a second frame once the swing is initiated and then wait until the swing is completed to get the third frame off. The camera will stay in Multiple Exposure mode until all of the exposures you selected have been shot.

Could it possibly be any easier? Nope. Experimentation will allow you to come up with your own recipe for images. Now just go out there and try it. But let's keep how easy it is to create multiple exposures our little secret. We don't want anyone to think that it's this easy to create some pretty cool images.

Monday, June 8, 2015

The Perfect Travel Photography Gear

If there's one thing in life that spins my wife's wheels it's traveling to Europe and visiting cathedrals, museums, and castles. When we've traveled abroad, I've always packed camera gear and I spend my time shooting street scenes, people, and travel images as we tromp around from place to place. My biggest challenges have always been: 1) taking a versatile array of equipment that can be transported in overhead bins; and 2) comfortably and safely carrying my camera gear around with me while I shoot. I think I've finally solved both problems.

Camera Gear For Travel

For years, when packing for trips abroad, I would grab two full size pro camera bodies, i.e. Nikon D2H, D2X, D3, D3S, D600 with battery grip, or D800E with battery grip, with newer models taking the place of older ones as they found their way into my equipment cache. These were complimented with an assortment of lenses including an f2.8 fisheye, wide angle f2.8 zooms, and f2.8 telephoto zooms. My long sports lenses, e.g., my 300mm f2.8, 400mm f2.8, and 200mm-400mm f4 lenses were never an option due to size, weight, and bulk. Even though I left the big boys at home, the travel photo gear I typically packed was still heavy and bulky, requiring its own overhead compartment-friendly case. While out and about shooting, carrying even a limited amount of this gear was tiring.

A little perspective - Nikon D800E and 15mm f2.8 fisheye (L); Nikon1 V2 and Nikon 1 10mm f2.8 lens (R)
During our most recent trip to Spain a couple of weeks ago, I proved to myself that I could shoot everything I wanted to shoot, but often couldn't because of focal length limitations, and still get quality images with much more compact equipment. On this trip, I grabbed a Nikon1 V2 camera body that I had picked up a few months ago in the hopes that it would perform capably for vacation/travel use. I also packed a D800E just in case the V2 did not hold its own. I then handpicked a limited number of select, smaller lenses that gave me the versatility I wanted with the V2 and its 2.7X crop factor. The final list included an 18-200mm f3.5-5.6 VR lens, my workhorse with its effective focal range of 48-540mm; a 70-300mm f4.5-5.6 VR lens with an effective, jaw dropping 189-810mm focal range; and the Nikon1 10mm f2.8 lens with a wide angle effective focal length of 27mm. I had room for my 15mm f2.8 fisheye so I threw it in the case as a wide angle alternative for the D800E.

On our first day in Madrid, I grabbed the Nikon1 and its 10mm f2.8 lens and put it through its paces as a test to see if it was all that and a bag of chips. After downloading images shot in the afternoon and evening, I was sold. The camera blew me away in terms of how it performed no matter what I threw at it. Low light, long exposures, candid shots, you name it, the images surpassed the quality I expected in terms of sharpness and noise levels. For the rest of the two weeks of shooting, the D800E never saw the light of day.
My first image with the Nikon1 V2, 1 Nikkor 10mm f2.8 lens
ISO 200, f2.8, 1/80th second
Second image with the Nikon1 V2, 1 Nikkor 10mm Nikon1 f2.8 lens
ISO 200, f2.8, 1/30th second 
Low light test - Nikon1 V2, 1 Nikkor 10mm f2.8 lens
ISO 20, f2.8, 1/8 second handheld
Needless to say, I will no longer be carrying monster camera bodies or big, heavy lenses when I travel abroad. I don't need to because of the 2.7X crop factor and image quality that far exceeded my expectations. You be the judge after looking at some of the images I managed to get, more of which I'll post below.


The Perfect Camera Bag That Isn't A Camera Bag

But let's talk about carrying stuff around. I hesitate to carry a conventional camera bag when I hit the streets in Europe as we do a lot of our getting around riding the Metros. Metro stations are a magnet for thieves who prey on unsuspecting, careless tourists. So are touristy venues with crowds, the kinds of places we often frequent. A Think Tank, Lowepro, Tamarac, or Fill-In-The-Blank camera bag screams "TOURIST ALERT - THOUSANDS OF DOLLARS IN STUFF RIPE FOR THE STEALING RIGHT HERE" and I'd just as soon not give potential thieves any more reason than necessary to target me as a mark. 

Until now, I've tried to make do with an assortment of unconventional bags in which to tote my stuff around, none designed for camera gear and none that were particularly functional. Some were a pain in the rear when trying to fit stuff in; some were borderline impossible in terms of easy access to the stuff inside; and some were very uncomfortable to carry after a long day of walking. In short, nothing worked to my satisfaction.

The good news is that I've stumbled upon the answer to my prayers - an ultra-functional, bomb proof, stealthy, oh-so-comfortable to wear, get-out-there-and-shoot bag - the Mountainsmith Day TLS Lumbar Pack. I found  it on Amazon for a very reasonable $65 and it arrived this week. 


Kit Cube Travel Case (L)
Mountainsmith is not an unfamiliar brand name to me as back in the day my Mountainsmith backpack served me well on several Appalachian Trail backpacking trips. At that time, Mountainsmith gear was considered  well made, very functional, durable, and comfortable as load haulers for the trail. So after I inadvertently saw this lumbar pack on Amazon and did a little research, I not only discovered that it was the perfect size, but Mountainsmith offered some camera specific accessories that turns this hiking hip pack into travel photo bag nirvana.

The Kit Cube Travel Case inside the Pack
The Mountainsmith add-on I found is the Mountainsmith Kit Cube Traveler Case which fits inside the main compartment of the Day TLS lumbar pack. It also arrived this week from Amazon - $35.

While it may not seem like it given its size, the cube will store loads of gear. As shown below, I am able to fit the following gear into the bag: Nikon1 V2 14.2 MP body with Nikkor lens adapter and a 70-300mm f4.5-5.6 VR lens; a new Nikon1 V3 18.4 MP body with Nikkor lens adapter (that I picked up after returning from Spain) and an 18-200mm f3.5-5.6 VR lens; 50mm f1.4 Nikkor lens; 85mm f1.8 Nikkor lens; 8mm Sigma f4 fisheye; 10mm Nikon1 f2.8 lens; and 10-30mm Nikon1 f3.5-5.6 VR lens.

Kit Cube unpacked
With this setup, I can shoot anything while traveling on vacation, maybe not quite as well as with my D800E and my usual compliment of pro level lenses, but certainly capably enough to generate quality images. The compact size, minimal weight, and technology of the Nikon1 bodies makes the setup more versatile than anything I've ever used. It's all complimented by a camera bag that does not look like a camera bag with a shoulder strap and a hip belt. Nobody is going to snatch it and run off with my gear when I least expect it or when trying to compose a shot and I'm in my own little world.
Above gear packed into Kit Cube

I can't imagine that I will actually take all these lenses with me the next time we head overseas. Most likely, the 50mm lens will not go but it's nice to know that an f1.4 prime lens with an effective focal length of 135mm (the ideal portrait focal length) will fit if I want to include a great low light, mild telephoto prime lens. Same goes for the 85mm, if I decide that I want to keep gear to a minimum, though a low light (f1.8) prime lens with an effective focal length of 230mm sure is nice when you need it.

Even if either or both of those lenses don't make the cut, I still won't throw everything into the bag for a day of shooting. At most I would take the 2 camera bodies, the 18-200mm, the 10mm, and the 8mm lenses on a typical day unless I know I will need to reach out and touch someone or something which would create a need to carry the 70-300mm. If I want to go light, I'll just grab the V3 body, the 18-200mm and/or the 10mm.

If I choose to pack my camera gear into the Day TLS Pack and carry it on to planes, I can certainly do that. Getting around airports while using the hip belt and shoulder strap will make carrying the gear easy as pie. But I'll probably use the Day TLS as a typical carry on/man purse with personal items, holding my iPad, passport, airline tickets, snacks, cell phone, paperback, glasses, yadda yadda. I will probably pack the Kit Cube with the camera gear into a second, larger carry on bag along with my laptop and all the other stuff that I don't want to go in checked baggage.

Tenba Toolbox 8 packed with spare batteries, chargers, card wallet, etc.
All of the other photography paraphernalia that I take will go easily into another little gem that I found on Amazon's web site, a Tenba Toolbox 8. It's a small, self contained padded case with velcro dividers with a clear zippered top.  The Toolbox series comes in three sizes, the Toolbox 4, 6, and 8. I picked up the Toolbox 8 for $37 and it's just the ticket for items like battery chargers, lens caps, spare batteries, cards, cables, and other miscellaneous accessories. Smaller than the Mountainsmith Kit Cube, it will easily pack into the carry on bag. If I want, on any given day when I hit the streets with one camera body and a couple of lenses, I can use this inside the Day TLS hip bag in lieu of the Kit Cube, freeing up space inside the bag for lunch or other items.

Show Me The Money - Images

When we traveled to Spain, I hoped I would have the chance to shoot a bullfight. I had been to a bullfight in Mexico City some forty years ago but sat in the nosebleed section, drinking my share of Carta Blanca and not paying a whole lot of attention to what was going on in the ring. As a sports photographer, the notion of capturing the action and pageantry of something so traditionally Spanish overrode my distaste for needless animal cruelty; and, shooting a bullfight would give me chance to see what a Nikon1 camera body would do with a long lens under challenging, action conditions. 

I wanted to get some tight action shots of the matadors mixed in with some wide angle images so I took two lenses to the arena, the 70-300mm and the 10mm. At the time I did not yet have the Nikon1 V3 with its 20 frames/second continuous autofocus capability but I made do with the Nikon1 V2's 15 frames/second setting and no continuous autofocus. Sitting in the stands 25 rows or so above ringside I fired away.

Below is a sampling of shots from that evening. The wide angle arena shot (first image) was taken with the 10mm f2.8 lens. It will give you some perspective as to my view from the stands and just how far away the matadors did their thing.  All of the other images were taken with the 70-300mm f4.5-5.6 Nikkor lens that is not much bigger than the 17-35mm f2.8 lens I used to regularly pack. I varied the zoom focal length depending upon the composition I was striving for.


The Nikon1'x 2.7X crop factor made the 70-300mm lens the equivalent of a 189-810mm zoom with no change in lens aperture. With remarkably fast focus, action images were sharp with shutter speeds no slower than 1/640th second at f5.6 even at a handheld 810mm. Equally impressive, images were relatively noiseless at ISO 400 and ISO 800. With that monster of a focal range, this one lens gives me much longer range capability at a fraction of the size and weight of anything I have carried in the past. When traveling, that's worth its weight in gold.

For every day tromping around, I used the 18-200mm f3.5-5.6 lens. It's smaller and lighter than my 17-35mm f2.8 lens but gives me an effective focal range of 50-540mm. With this range, it was my go-to lens while walking around. Regardless of whether I was indoors shooting a cathedral in low light without a tripod or shooting candid shots of locals from a distance, I was dazzled by the performance. If I needed to go wide, I simply popped on the 10mm or just shot a vertical series of overlapping images and used Photoshop's Photomerge feature to stitch the images together.


The 10mm was put into heavy use, especially at night when we headed out to dinner and I didn't want to carry a bunch of gear with me. Fitted onto the V2 body, the combo was literally small enough to fit into a shirt pocket while still giving me what I consider to be great low light, handheld images even with long exposure times.


Final Thoughts...

The moral of my story is that with technological advances in mirrorless cameras like the Nikon1 system, traveling to distant places on vacation no longer has to be as much of a compromise as it used to be. No longer do I have to balance size, bulk, and weight with ease of portability. Small and light with a good dose of versatility is now possible while still maintaining good image quality. If someone had told me five years ago that I could stash a small bag in a plane's overhead compartment with gear that would let me shoot 20 frames/second in continuous autofocus and a focal length of 810mm I would have asked them what they were smoking.

Toss in what I consider to be the ideal bag in which to carry gear and travel/vacation photography has taken a giant leap forward for me. I can't wait to take the V3 for a spin on our next trip.