Showing posts with label lighting. Show all posts

Tuesday, July 26, 2016

Speed Light Soft Box Diffusers - Portrait Lighting And More


Last week, I had to do a head shot photo shoot of all the personal trainers for a Gold's Gym location and it took place inside the facility as the trainers took their breaks in between sessions with clients. In finalizing the details for the shoot, I was told that I had to set up and tear down quickly using a minimal amount of gear in order to avoid being in the way of customers using the equipment to work out.

For a shoot involving portrait head shots I would normally grab a couple of cases containing monolights, some light stands, a couple of soft boxes, a beauty dish, and a background stand with a roll of seamless white or gray paper.  I was told not to bring that. "Just bring a flash", they said.

That was not an option for me. I know what portrait/head shot images look like when taken with "just a flash". The images look like crap because the lighting is not flattering to the subjects and no one is happy with the results. But clients don't know that. To them, as long as there's enough light to take a photo, that should be fine. As a a professional, I know better. Plus, my reputation is on the line and the last thing I want is for people to judge me by inferior images I created, even if the client unintentionally handicapped my efforts.

Forced to compromise, I resorted to a quick, easy (and cheap) alternative to my usual studio lights - speed lights with small soft box diffusers.


A couple of years ago, I was strolling through Best Buy and stumbled across these small speed light soft boxes that fold flat for storage and attach securely to any brand of speed light with an elastic velcro strap. I found two in open boxes and couldn't pass them up for $15 apiece. I didn't know if I would ever use them but for $30 for the pair I thought they might come in handy someday.

Since then, I've used them a lot. When shooting grip and grin events, these are my go-to speed light  attachments. I can angle the flash 45 degrees up and bounce the light off a ceiling or shoot straight at the subjects. Either way, the light that reaches them is soft and shadows behind subjects are virtually eliminated.


During a recent event, I used the soft box on a speed light, mounted the speed light on the hot shoe of my camera body, and pointed the soft box directly at my subjects. I was afraid that the speed light wouldn't be able to diffuse the light sufficiently to light up all the subjects in this image but it was absolutely no problem for this little soft box. There are no shadows behind the subjects, little if any light fall off, and the light is flattering, all things considered.

But a head shot photo shoot was an altogether different challenge. Would these little soft boxes do the job,  give me the image quality I strive for, while at the same time allowing me to use a minimal amount of gear?


These are examples of the end result from the photo shoot at Gold's Gym. Head shot portraits of some of the staff taken with two speed lights and two of the Best Buy speed light soft boxes.


Because space was at a premium, I did not use a background stand or seamless paper for the shoot. However, I did use a couple of light stands to set up the speed lights. Although I packed a stand and paper roll (just in case there was no suitable background), after arriving on location I found a gray wall that was out of the way and which served as a perfect background.

Positioning the subjects 5 feet away from the wall, I set up the lights at 45 degree angles on either side of the subjects. I set the speed lights to Manual mode, used a flash meter to test the exposure, and first metered the speed light on the left (my key light). I adjusted its power and distance from the subject until the meter read f8.0. I then did the same with the speed light on the right (my fill light) until the meter read f5.6. If I had wanted to really simplify things I might have been able to use a reflector for the fill instead of the second speed light but a reflector would have taken more room so I went with two lights.

So, if you're ever confronted with a portrait shoot where space is a premium, if you choose to do a shoot with a minimal amount of gear, or if you simply want to dabble in studio portrait photography and don't want to spend a lot of money, give these small soft boxes a shot. Even with the speed light strobist craze that has jacked up the price of used speed lights, brand name speed lights are still available on the used market. Since I prefer to use the lights in Manual mode, there are plenty of used Nikon SB24's, SB25's, SB26's, etc. available for $30-$50 apiece. Depending on the model, infrared triggers will remotely trigger them. If not, there are many inexpensive (but dependable) wireless triggers that work perfectly well.

Wednesday, September 24, 2014

Quick & Easy Head Shots

Many businesses that have web sites include a page or pages featuring head shots of its employees. One type of business that almost always uses head shots of its employees on its web site is a law firm. Google any law firm that is of any size and you will find a link for a comprehensive list of its attorneys. Each attorney will have a link for his or her own page that includes their educational and professional experience along with ... a head shot.

Since law firms want to present their attorneys in the most flattering manner possible, they usually have the head shots done professionally. That's where you, the wily professional photographer, comes in. You can do a quick and easy head shot session on site if you set yourself up with a minimum of gear and use some basic lighting techniques. From there, very profitable photography gigs can follow as you develop a reputation for being a capable web site head shot photographer.

I just finished doing one of these head shot gigs last week for a law firm that is revamping its web site. It's a small firm so the shoot involved seven attorneys and the firm's office manager (one of the attorneys was out of town and will come into the studio for her head shot in the near future to finish up the job). From the time I left my studio until I returned, which included an hour driving to and from the firm's offices, less than three hours elapsed. Afterwards, I spent approximately an hour downloading the images, selecting the best one of each person, and running them through Photoshop. Including the time it will take to shoot the last attorney, I will have devoted a little over four hours for the entire job. Oh, and I received a nice check for my effort before I left the firm's offices the day of the shoot, paid in full for the job.


The image above depicts the gear I took with me. The two aluminum cases on the left contained three Photogenic 600W/second monolights that I picked up on eBay a while back for a total of less than $200 (with cases). I could have opted to go with speedlights but since I have the monolights packed up for things just like this I went with the monolights. I only used two on this job but took a third as a spare. The smaller aluminum case also contained power cords, extension cords, a spare bulb for the moonlights, a flash meter, and three pocket wizards to trigger the lights. With a two light setup, two pocket wizards suffice (one on the camera and one on the key light - the other monolight will fire via its slave sensor), but I always assume something might not work right so I packed an extra pocket wizard, monolight and an extra bulb.

The camera bag on top of the small aluminum case contained two camera bodies (again, redundancy in case of a failure), a 70-200mm f2.8 lens (my go-to portrait lens), an 18-200mm f3.5-5.6 lens (another great portrait lens, a spare just in case), and an 85mm f1.8 lens (another sharp portrait lens, just in case). I took a stool on which the subjects could sit since I was fairly confident the law office would not have one for me to use. The black bag on the left contained a portable backdrop stand and a roll of 53" wide grey seamless paper. The black bag on the right contained three light stands, two to use and the third as a backup. Last but not least, I packed two softboxes, a 9"X36" gridded strip box to use as my fill light and a 2'X3' box to use as my key light. For head shots, you don't need anything bigger as these boxes are more than enough to light head shots. 


I'll digress for a moment to elaborate on the speed light option. Several companies make brackets designed to attach a typical strobe to a soft box (as shown above). These lights can be triggered with pocket wizards or infrared triggers. Using speedlights is certainly a less expensive way to adequately light head shots and if you don't have access to monolights and have speedlights, by all means use them. Another option is to simply use one light (monolight or speedlight) for the key light and a reflector for fill. It's simpler and less equipment intensive but I prefer to use a two light setup when possible with monolights. If electrical power is not available (as in shooting in a remote location), Plan B is my speedlights.

Once I arrived at the law firm, it took less than a half hour to set up in the lobby. This was the location that provided plenty of room for not only the lighting setup but for me to use my 70-200mm lens at a 135mm to 150mm focal length which I find to be a good portrait focal length. I could have set up in the firm's large conference room (behind the backdrop) but it would have required moving the large conference room table to one side. Since the lobby was available that's where I set up.

The large softbox (left) was my key light and the strip box was the fill. Using a pocket wizard, my flash meter, and myself as a guinea pig sitting on the stool, I adjusted the power of the key light to f11 at 1/125th second, ISO 200. The power of the strip light (right) was adjusted to f8 so as to give me a slight shadow on the fill side but nothing dramatic. The lights were positioned approximately three feet from the subjects to create a soft, flattering light (Lighting 101 - the further lights are positioned from a subject, the harsher the light becomes).

I've posted some examples of the images from the shoot. For each person, I took several shots like those on the left side, i.e. from the head to just below the hands. I asked each person to sit up straight at a 45 degree angle to me and then turn their head to face me. Some of the shots were with full smiles, some with no smile, and some with something in between. After I downloaded the card, I chose the image I thought was most flattering for each individual and ran them through Photoshop and OnOne Software's Perfect Portrait and Perfect Effects. After opening the RAW files in Photoshop CC, I used the Camera Raw filter in to adjust exposure, highlights, whites, shadows, and blacks, adding a bit of contrast, clarity and vibrance. The Spot Healing tool, Patch tool, and clone tool were used to eliminate blemishes and shine. I only used Perfect Portrait to brighten the men's eyes and judiciously whiten the teeth. With the females, I used some of the skin smoothing/wrinkle softening features but very modestly. Finally, I used the Portrait Sharpen feature in Perfect Effects as the final step and then cropped the images into the final head and shoulders head shots (images on the right).

There you have it - quick, easy, simple head shots on site. This kind of photography is not going to tap into your creativity or generate "wow" images that will dazzle your friends but it can be a steady source of income that pays the bills. That's always a good thing.

Wednesday, June 19, 2013

Sabre Rattling And Rolling - My F-86 Sabre Image


One of my birthday presents from me to me was shooting some of the aircraft at the Valiant Air Command's Warbird Museum this past weekend. A second present was carving out some time to process some of the images the way I thought they should look and try to give some of the aircraft a different look than just a straight up image. So, I've been trying different things and what you will see here is the product of this exercise.

The image above is of an F-86 Sabre Jet, one of the coolest looking aircraft, at least in my mind. This guy was the U.S.'s first swept wing jet built to counter the Soviet Union's Mig-15 and cut it's teeth in the Korean War. Unfortunately, my only chance to shoot this aircraft was inside a hangar, parked amidst other aircraft on display. I wanted to create an image which did justice to this beauty and a static, conventionally processed image with other plane's wings, signs, etc. in the image just didn't cut it for me. So I set out to do a combination of +Tim Wallace and  +Joel Grimes thing with it.

First, the Tim Wallace "one flash" technique. For a more detailed description of this technique, go to this post on my Blog.


I started out by taking a "base" image shot of the plane with the camera on a tripod using only the available light. Camera settings were ISO 200, f5.6 @1/30th second. You can see all the distracting stuff in the background along with the hangar beams and ceiling. I could have just processed this image and come up with an OK image but as I said, I wanted more.


The next step was taking multiple flash exposures of the plane using one flash for each exposure. I walked around the plane and triggered both the camera and the strobe remotely. I used a paint roller extension pole with the strobe mounted on the end to allow me the ability of extending the flash as high or as low as I wanted, lighting up different parts of the plane.

Next, I created a layered image of the plane by using several of the flash images on top of the "base" image and brushing in those parts of the plane that I illuminated with the flash. I probably took 30 different flash images but used 7 or so to highlight certain areas to my taste. I saved that as a PSD file and moved on to getting the plane onto a different background that would do it justice.


Being the tacky, gaudy kind of person I am, I couldn't go with a plain vanilla background. I searched around and finally settled on the image above. After some manipulation in Photoshop (brightness, contrast, color adjustments, etc., then added blank canvas and stretched the image vertically to give me more room into which to drop the plane), I continued by "selecting" the plane from its image using the Quick Selection Tool.

After spending some time trying to get the basic airframe within the selection, I used the Refine Edge feature to get a better selection and saved the image as a New Layer with Mask (above). As you can see if you enlarge the image, you can only do so much with these tools in terms of getting clean edges and selecting only what you want. But that's why you using the New Layer with Mask option - after selecting this option, you can use the brush tool on the mask and really fine tune the selection. Depending upon whether you brush in or brush out, you can bring bits of the image back in that were inadvertently left out and you can remove bits of extraneous stuff that you don't want. If you take your time and enlarge the image while you work with the brush and play with the brush size, opacity and softness/hardness, you end up with....

 ...a much better, cleaner cutout. Joel Grimes will tell you not to sweat the tiny little details but I guess I'm just too anal and have an inner need to go through the selection with a fine tooth comb, removing any little tidbit of crap and bringing back in any teeny little detail that is missing. It's way more time consuming (it took me 3 hours to get to a point where I was satisfied) but that's just me.


 I was finally ready to drop the cutout plane into the background and with the "Move" tool I brought the plane layer into the background layer. After moving it around some and using the Transform Tool's rotate, warp, skew, perspective and distort features to arrive at the final appearance of the plane, I flattened the layers. Then came some final tweaks with the burn tool (highlights, midtones and shadows along the bottom and on the plane's wheels to blend it in to the background a little better and make it appear to be parked on a dark tarmac.


Last but not least, I added the Joel Grimes' signature light streaks by using the dodge tool with the highlights and midtones. I started with a soft brush outside the image and brought it in towards the plane three times on each side to give the appearance of floodlights illuminating the plane as it sat.

The final image of the F-86 is a far cry from the way it looked sitting in the hangar. I really like the way the plane looks against the dark yet colorful background and in the end, I accomplished what I set out to do - take the plane out of its hangar and create something different. Happy Birthday from me to me.

Monday, June 17, 2013

Light It Up With Only One Strobe

1940's Stearman Biplane
As I mentioned last week, I was granted access to a very cool collection of aircraft on exhibit at a museum and ventured down for what I hoped to be a great day of dabbling in a new area of photography - aviation. Also as you know from this blog, I have been experimenting with automobile photography over the past couple of months using lighting techniques I learned from UK photographer +Tim Wallace via +Scott Kelby's +KelbyTraining.com. For the sake of brevity and in order to avoid boring you with a complete rehash of Tim's automobile lighting techniques, it involves extensive use of strip softboxes powered by high end, power pack-powered studio strobes. I have altered Tim's method by utilizing hot shoe strobes, making it easier for me to transport the gear, not to mention making it a lot cheaper for me to put together a portable light kit.

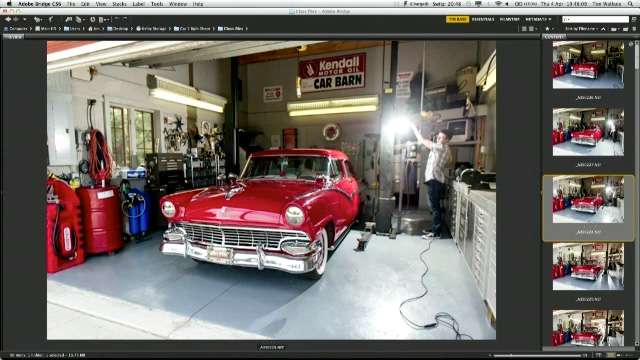
Screen Shot of Tim Wallace's lighting video on KelbyTraining.com
Well, Tim must have felt the pain of us poor schlepps who can't plop down beaucoup dinero  for a state of the art, portable lighting kit. He recently came out with a +KelbyTraining.com video on how to shoot a full frame image of a car in a garage while using only one hot shoe strobe. Before heading down to the aircraft museum, I had watched the video and decided to try Tim's method on the museum's aircraft. I have only had time to process the images of one of the aircraft I photographed but I can say that Tim's technique rocks. The lead image of the 1940's Stearman Biplane is the product of using Tim's method and I think it's a much better image than what I would have ended up with had I shot the plane conventionally.

Here's what I did, following Tim's recipe with a description of the gear used.


The first thing in the way of gear that bears mention is the Kasey Enterprises pole adapter (Above & Left) which I picked up at the Orlando Photoshop World Expo in the spring but which you can order online. I discovered this little gem while attending +Joe McNally's Pre-Con workshop when his assistant busted this thing out attached to a paint roller extension pole. The pole was used as a hand held  "light stand" for a hot shoe strobe bracket, three SB-800 strobes, and a 7' parabolic shoot-through umbrella. Joe mentioned that this gizmo was now standard equipment for him and after an afternoon of shooting with this thing I was sold.

The adapter allows you to convert a paint roller extension pole into a hand held light stand onto which you can attach a studio strobe or a hot shoe strobe mount. The Kacey adapter simply screws onto the end of the paint roller extension pole. You probably already have a paint roller extension pole around the house but if not, Lowe's, Home Depot, Walmart and Ace hardware have an extensive selection of poles in a variety of lengths. I elected to go with a Wooster 4' to 8' pole from Lowe's ($25) because it's extremely sturdy, it's light weight, and it has a thumb release locking mechanism which allows you to extend the pole in 6" increments and then it locks the extension pole in place. I prefer this mechanism to the more typical twist type of locking mechanism as it is more secure and much easier to use when trying to extend the extension pole (especially when using something as large as a 7' parabolic umbrellas as light modifiers which I bought at the Expo as well).

For the aircraft shoot, I attached one of my hot shoe strobe mounts to the end of the Kacey adapter and then mounted an SB-800 with its diffuser on the strobe mount.

The Wallace one-strobe method requires a tripod for the camera, a remote camera trigger, and a remote strobe triggering method. I set up my camera on a tripod with a 17-35mm f2.8 lens as low as the tripod would permit so I could shoot up at the Stearman. This is one of many tips I picked from +Moose Peterson's +KelbyTraining.com video on aviation photography. Moose's video is a great resource for getting started in this genre of photography as Moose is the man when it comes to aircraft photography. As soon as I found out I would have access to the museum's aircraft, I made it a point to watch Moose's video. Until now, I had never spent any time shooting planes and who better to walk me through that minefield than Moose?

I used a couple of Pocket Wizards as the remote camera trigger by attaching one to the tripod and running a cable from the Pocket Wizard to the camera's remote input and set the second Pocket Wizard to transmit. I used my SB-800 Commander to remotely trigger the SB-800 so that  every time the Pocket Wizard triggered the shutter, the SB-800 would trigger the flash.

Stearman "base' image
The secret to Tim's method starts with the tripod mounted camera. Once you decide on the image's composition, you take a "base" image from which you will work in post processing. The "base" image is one created by using only the scene's available light (no strobe), metered for the available light.  This image is the foundation for the final image onto which you will layer portions of images that are subsequently taken with the strobe. In my case, I used a camera setting of f5.6 @ ISO 200 and 1/100th second.


The next step in Tim's method involves walking around the subject (in his case, the car, in mine, the aircraft) with the strobe mounted paint roller pole and remotely triggering the camera/strobe from numerous positions (as shown above). I used a camera setting of f5.6 @ISO 200 and 1/60th second. Tim suggests that you shoot as many of these images as you can, some of which will end up being used and some of which will not, but you won't know which you will use until you start processing. Since you can never recreate the "base" image after the camera is taken down from the tripod, Tim is adamant about taking as many images as you can, including a few with the flash bounced off the ceiling. He also encourages a few shots of background and floor portions of the scene being lit up by the strobe.

By moving around and pointing the strobe at various parts of the subject and scene, you create highlighted parts in each frame you shoot. These areas are flooded with light from the strobe while all other areas remain unlit. With the camera in one stationary position the entire time you are shooting, it's a piece of cake to subsequently layer in the "lit" portions of the images that you get in the different frames as you see fit.

For the sake of comparison, here are my two images, in sequence - the first is the "base" image which depicts what the image would have looked like without augmentation by Tim's method. The second is the finished product after selecting and layering in various highlighted portions and then adding some post processing techniques which I learned from watching +Moose Peterson's Kelby Training video on how to shoot sircraft.


Tim's technique is a great one for those occasions when you only have only one strobe at your disposal and want to create a uniquely lit image of a large subject. It's also a great method even if you have multiple strobes at your disposal but choose not to use them. I intend to continue exploring Tim's method in other settings and am grateful to him for giving me another trick to have in my back pocket. And of course my hat's off to Moose for giving me the foundation from which to use Tim's method.