Showing posts with label aviation photography. Show all posts

Friday, February 5, 2016

Breitling Sabre Ad - From Start To Finish

 Commercial photography and ad creation are particularly appealing to me. It is the ideal situation for turning one's imagination loose in the creation of the various puzzle pieces that comprise the final image. Most of the time, my part in an an ad begins and ends with the images, usually of a person or persons, but sometimes my portion of the process includes backgrounds. Seldom do I ever become involved with text, graphics, logos, or the composition of the final ad.

But just because I am not paid to be involved in the creation of the final copy for an ad doesn't mean that I can't do so for my own amusement. So, I recently took a page from Breitling's ad campaigns that feature cool aircraft, expensive watches, and outdoor scenes and put together my own version of a Breitling ad that included all of the bells and whistles.

Above is the ad I created. I started out by searching for a place where I could photograph the coolest of the cool in aircraft. After some searching, I was invited to shoot the aircraft housed at the Valiant Air Command in Titusville, Florida and after arriving I decided to shoot a classic North American F-85 Sabre. The folks at the facility gave me free rein to set up  lights and shoot, and using several Nikon SB-800 strobes placed out of my sight line and triggered remotely, I was able to light up the Sabre the way I wanted.

Using the quick selection tool in Photoshop and the refine edge feature, I was able to cut the Sabre out from the background, saving it for later insertion into a different background.
I then turned my attention to finding that perfect background. I tried several different scenes but I ultimately opted for the simplicity of a silhouetted mountain scene at sunset. I thought the colors would work well with some tweaking and the sun peeking through a break in the clouds would allow me to add shafts of light shining down on the Sabre.  The way the image faded to almost black along the bottom was also conducive to expanding the canvas with black where the ad's text would ultimately reside.


Next up was my pilot. I wanted a Top Gun kind of look so I posed a model as shown (L) with a wrist exposed. That is where I would later add the Breitling watch that was going to be featured in the ad.

I also wanted the pilot image to have a moody look to it.  so I gave it my best shot through lighting. The key light (left part of the face as you're looking at it) was metered at f11 while the fill light (on my right) was metered at f4 to create a dramatic shadow on the left side of the pilot's face. I used a snoot on both lights to limit the light spill and that created a nice light drop-off/shadow as you go from the face to the body. Once again, using the quick selection tool in Photoshop and using the refine edge feature, I cut out the pilot from the image and saved it for later insertion into the background.

With some of my puzzle pieces falling into place it was time to drop the Sabre into the background. Through various layers, I adjusted the shadows below the fuselage to blend the Sabre into the background with the hopes of making it look less like a dropped in cutout and more like a Sabre actually photographed on site. 

Some additional refinements of the shadows below the fuselage blended the Sabre into the scene even better and allowed me to begin the process of working in some shafts of light shining down on the Sabre. At first, I through I would have light shafts coming from both sides of the Sabre but in the end decided on having them coming just from where the sun peeks out through the clouds. The light shafts were created in separate layers with the Dodge tool in Photoshop and then positioned as I saw fit. In the image below, I had added the light shafts but had not re-positioned all of them on the right side of the image.

It was time to add the third puzzle piece, the pilot. With the Sabre on the right side of the image, the only logical place to insert him was on the left. When I did that, I had a nagging feeling that it just didn't look right knowing that I still had other puzzle pieces to add in the form of text, the Breitling logo, and an image of the watch to name a few things. So as an experiment, I flipped the image horizontally.


For some reason, this orientation just looked better to me notwithstanding the lettering that was now reversed. That wasn't a big deal as I had planned on removing the "U.S. Air Force Skyblazers" and replace it with Breitling lettering and logo.

First, the "U.S. Air Force Skyblazers" lettering was removed, as was the pilot's name that appeared just below the jet's canopy ....

The Breitling logo was added as well as the "Breitling" text, all of which had to manipulated with the Transform-Warp feature in the Photoshop Edit drop down menu so the perspective would appear natural on the side of the Sabre. The pilot's name was copied, reversed, manipulated for perspective, and pasted just below the canopy. I forgot to do this to the rudder numbers at this point but eventually did so. I also added Breitling's "1884" text below the Breitling text before finalizing the image.


I moved the light shafts into place as if they were coming from the sun, warmed the color a bit, and softened/blurred them. I then enlarged the canvas below the image with a black addition and blended it in to the image. As an afterthought, I removed the Top Gun patch from the pilot's flight suit. Later on, I added the Breitling yellow logo as a patch on his left arm.

Now it was time to add more puzzle pieces, i.e. the watch, the Breitling logo, and the ad's text. I had to add the watch not only at the bottom of the image but also on the pilot's wrist. Doing so required cutting out the watch image from its background, flipping it upside down, and manipulating the perspective so it would look right on the pilot's left wrist


I did some research on the F-86 Sabre so I could compose the text in the add. I also read a bunch of Breitling's marketing literature on the watches and came up with the following. The slogan "Aviation is in its DNA: came to me at the last minute and I thought it fit perfectly - short, sweet, and if I may say so, catchy:

Merging everything into place, moving things around, and playing with the size of the various puzzle pieces gave way to the final image.

My version of what a Breitling ad would look like. Now if only Breitling would hire me to actually shoot one of their ads....

Friday, June 21, 2013

One Blue Angel, Two Blue Angels...Six Blue Angels


As I went through the last batch of images from my shoot at the Valiant Air Command's Warbird Museum, I was hoping to do something special with the images I shot of an F/A-18 Hornet on display within one of the museum's hangars. The F/A-18 Hornet is the Big Dog of the Blue Angels' aircraft, the latest, greatest aircraft they are (or at least were) flying in air shows. Somehow, a static image in a hangar, cluttered up by other planes and paraphernalia, just didn't feel right to me. If there ever was a time to push the envelope and tap into what little creativity I have, this was it.


This is the base image I had with which to work. I shot numerous images of the jet after shooting this one by walking around and triggering a flash remotely, and one option I had for a final image was to layer some of those exposures over the top of this one and brushing in the flash highlights to augment the lighting. But, this was something I had already done on a couple of other aircraft images so I didn't want to reprise something I'd already done. Cutting the the F/A-18 out of it's background and dropping it into a different background was my next thought, but I'd already been there, done that with an F86 Sabre so that seemed lame. Then a thought crossed my mind - why not do that but create an entire squadron of F/A-18's on a separate background? That was the ticket.


I found a background that I thought would work and ran it through Perfect Effects to adjust the way it looked. Using the Transform feature in Photoshop after enlarging and stretching the canvas, I adjusted the perspective and cropped the background with enough room to fit a squadron of planes and keep the horizon on the upper third of the image (Rule of Thirds, don't-cha know).

Next came the process of selecting the F/A-18 and creating a New Layer With Mask. Bippity, boppety, boop, Quick Select here, Refine Edge there, Brush in/Brush out and the selection was ready for Perfect Effects. In Perfect Effects, I added Clarity, Tonal Contrast and HDR Exaggerated Edges & Tone.


I dropped the F/A-18 into the background, duplicated the layer five times to create a total of six aircraft and began moving them around as I tried to decide which way to position them. After deciding where to position them, I adjusted each F/A-18 layer with the Transform feature's Perspective, Skew, Distort, Rotate and Scale tools to hopefully make the squadron appear to be parked in the desert landscape. With the Burn tool, I burned in some shadows beneath each plane to further the illusion.

Bingo. A squadron of F/A-18 Blue Angel jets waiting to take off and do their thing. Now if only we could see them fly again....

Thursday, June 20, 2013

Camelia Dareheart - Creating A Composite From Two Images Shot Months Apart


Creating composite images are an endless source of joy for me. After discovering the work of +Joel Grimes, a whole new world opened up for me. I do not pretend to possess the photography talent or Photoshop skills of Joel so my images don't compare to those that Joel creates but I try to get better with every image and with every concept I dream up.

My latest composite (above) is the product of two photo shoots several months apart. While at Photoshop World in Orlando, the Westcott booth conveniently provided me with the chance to shoot a model dressed in a period aviation outfit standing in front of a vintage aircraft backdrop (L). When I had a chance to pose her, I asked her to try a few things for me and got 60-70 images of her in various poses. The last thing I expected was to use any of the images in a composite and the image on the left was one that I never thought I would use at all,  but that's one of the beauties of photography - you never know when an image that has never seen the light of day suddenly becomes the perfect image for a project.

Until this morning, I hadn't even processed the image and it remained stored in the bowels of my external hard drives in RAW format. Last night, I came up with the idea of creating a composite with one of the 1940's Stearman biplane images I took this past weekend at the Valiant Air Command's Warbird Museum and remembered the shoot with the model I have renamed "Camelia Dareheart". She was perfect for a composite involving the Stearman so I searched through the hard drives and found the folder with her images. After going through the various poses and images, I decided to use the 3/4 shot of her in the pose you see above left, which is straight out of the camera before any processing.

After running her through Photoshop with some basic processing, I used the Quick Selection tool to roughly create a selection of just her followed by some fine tuning with the Refine Edge feature (Right). I saved the image as a New Layer With Mask so I could further refine the edges and bring back any bits of detail inadvertently omitted and take out any bits of detail that didn't belong by using the brush on the mask. I couldn't resist following this up by running her through Perfect Portrait to smooth her skin a bit.


Next came the background. While at the Warbird Museum, the owner of the Stearman towed the plane out onto the tarmac for some engine maintenance and while I was setting up to shoot a B-25J Mitchell, I heard the Stearman's engine fire up. I grabbed my tripod mounted camera and ran outside the hangar, set up the camera (which fortunately already had a 17-35mm lens attached), composed the image quickly, and fired the shutter. When I realized the engine was going to run for a bit, I took multiple exposures at 3-stop intervals under and over the metered exposure. The mechanic working on the engine was leaning on the right wing of the plane the whole time but I remembered +Moose Peterson's words of wisdom - don't sweat people getting in your frame as Photoshop's "Fill - Content Aware" will remove them. It did - sort of. I had to also spend some time with the clone tool to clean up what Fill didn't get or didn't get right but no big deal. But I'm getting ahead of myself because first I had to open the series of images in Photomatix Pro and create an HDR image from the various exposures. Opening up five of the exposures in Photomatix Pro and using the "Creative" preset yielded the image above. I removed the mechanic and moved on to the next step - removing the hangar and nose of a jet on the right side of the background and then resizing/cropping the background for insertion of Camelia.


In order to make it as easy as possible to eliminate the unwanted portions of the background, I enlarged the canvas (above) and selected the right part of the image (starting with a full height vertical line halfway between the hangar and the spinning prop and then drawing the rectangle box to the right just beyond the vertical edge of the image). Using the Transform tool's "Scale" adjustment, I stretched the image to the right until the hangar was outside the canvas. I then used the Rectangle Marquee tool to do the same thing on the left side of the image as I needed room to drop Camelia in. I started the vertical edge of the left side selection to the left of the left wingtip and extended the rectangle to the left until I was just outside the left vertical edge of the background. I then repeated the stretching process I used on the right side.

Because I wanted to position the plane lower in the final image from a composition standpoint, I used the Free Transform feature to enlarge the image upward and fill the remaining part of the blank canvas. Last but not least, I cropped the image to remove some of the bottom area from the background which effectively moved the plane downward in the image.


Now that the background was sized the way I wanted and with both image layers  opened in Photoshop (Camelia & the background), I used the Move tool to grab Camelia and drop her into the background (above). Then I had a decision to make - was I happy with the final image in color, would I go with Black & White, would I desaturate the background and leave her in fully saturated color, or would I try something else? I knew I had to do something else with her as the background had an HDR effect and she was clean. My gut told me that the image screamed for a vintage look/feel so I decided to run her layer through my Perfect Black & White plug-in to give her a sepia-ish tone. Then I ran her through Perfect Effects and applied an HDR effect along with tonal contrast and the Grunge Goddess preset (Left image above). I had to be careful with these effects as with women, adding a lot of "grunge" can make them look pretty nasty and that is not what I wanted. I did, however, want a sharp, edgy look so I adjusted the opacity of each effect downward to various degrees. The last step (Above, Right) was to add the "Amazing Detail" preset to the mix. That gave her crisp edges that dovetailed nicely with the crispness of the HDR background.

Now that she had a sepia tone, I had to go back to the background layer and do the same to it. Sending the background to Perfect B&W and then into Perfect Effects for some minor adjustments yielded the final image which leads off this post and is re-posted below. My Camelia Dareheart composite. Not a Joel Grimes worthy image but not too shabby.


Wednesday, June 19, 2013

Sabre Rattling And Rolling - My F-86 Sabre Image


One of my birthday presents from me to me was shooting some of the aircraft at the Valiant Air Command's Warbird Museum this past weekend. A second present was carving out some time to process some of the images the way I thought they should look and try to give some of the aircraft a different look than just a straight up image. So, I've been trying different things and what you will see here is the product of this exercise.

The image above is of an F-86 Sabre Jet, one of the coolest looking aircraft, at least in my mind. This guy was the U.S.'s first swept wing jet built to counter the Soviet Union's Mig-15 and cut it's teeth in the Korean War. Unfortunately, my only chance to shoot this aircraft was inside a hangar, parked amidst other aircraft on display. I wanted to create an image which did justice to this beauty and a static, conventionally processed image with other plane's wings, signs, etc. in the image just didn't cut it for me. So I set out to do a combination of +Tim Wallace and  +Joel Grimes thing with it.

First, the Tim Wallace "one flash" technique. For a more detailed description of this technique, go to this post on my Blog.


I started out by taking a "base" image shot of the plane with the camera on a tripod using only the available light. Camera settings were ISO 200, f5.6 @1/30th second. You can see all the distracting stuff in the background along with the hangar beams and ceiling. I could have just processed this image and come up with an OK image but as I said, I wanted more.


The next step was taking multiple flash exposures of the plane using one flash for each exposure. I walked around the plane and triggered both the camera and the strobe remotely. I used a paint roller extension pole with the strobe mounted on the end to allow me the ability of extending the flash as high or as low as I wanted, lighting up different parts of the plane.

Next, I created a layered image of the plane by using several of the flash images on top of the "base" image and brushing in those parts of the plane that I illuminated with the flash. I probably took 30 different flash images but used 7 or so to highlight certain areas to my taste. I saved that as a PSD file and moved on to getting the plane onto a different background that would do it justice.


Being the tacky, gaudy kind of person I am, I couldn't go with a plain vanilla background. I searched around and finally settled on the image above. After some manipulation in Photoshop (brightness, contrast, color adjustments, etc., then added blank canvas and stretched the image vertically to give me more room into which to drop the plane), I continued by "selecting" the plane from its image using the Quick Selection Tool.

After spending some time trying to get the basic airframe within the selection, I used the Refine Edge feature to get a better selection and saved the image as a New Layer with Mask (above). As you can see if you enlarge the image, you can only do so much with these tools in terms of getting clean edges and selecting only what you want. But that's why you using the New Layer with Mask option - after selecting this option, you can use the brush tool on the mask and really fine tune the selection. Depending upon whether you brush in or brush out, you can bring bits of the image back in that were inadvertently left out and you can remove bits of extraneous stuff that you don't want. If you take your time and enlarge the image while you work with the brush and play with the brush size, opacity and softness/hardness, you end up with....

 ...a much better, cleaner cutout. Joel Grimes will tell you not to sweat the tiny little details but I guess I'm just too anal and have an inner need to go through the selection with a fine tooth comb, removing any little tidbit of crap and bringing back in any teeny little detail that is missing. It's way more time consuming (it took me 3 hours to get to a point where I was satisfied) but that's just me.


 I was finally ready to drop the cutout plane into the background and with the "Move" tool I brought the plane layer into the background layer. After moving it around some and using the Transform Tool's rotate, warp, skew, perspective and distort features to arrive at the final appearance of the plane, I flattened the layers. Then came some final tweaks with the burn tool (highlights, midtones and shadows along the bottom and on the plane's wheels to blend it in to the background a little better and make it appear to be parked on a dark tarmac.


Last but not least, I added the Joel Grimes' signature light streaks by using the dodge tool with the highlights and midtones. I started with a soft brush outside the image and brought it in towards the plane three times on each side to give the appearance of floodlights illuminating the plane as it sat.

The final image of the F-86 is a far cry from the way it looked sitting in the hangar. I really like the way the plane looks against the dark yet colorful background and in the end, I accomplished what I set out to do - take the plane out of its hangar and create something different. Happy Birthday from me to me.

Tuesday, June 18, 2013

The Making Of The Tico Belle

Trying something new is always a good way to test oneself, and when it comes to photography, you never know what the result will be. In the digital age, experimentation is possible without the cost of film and processing and the only investment is time. If things go well, you learn how to go about trying to capture an image and also have some sporty new photos to process; if things don't go well, you've only lost a bit of time but hopefully you learn what not to do the next time out.

With the sports season over for me until the Fall, I finally have some time to dabble in shooting things I never have time to shoot. This year, I decided to try my hand at shooting cars, and that recently morphed into an opportunity to shoot some aircraft. Saturday was my first opportunity at what I will loosely call aviation photography. I say loosely because I'm not sure that shooting a bunch of static aircraft in hangars qualifies as aviation photography. The only reason I feel comfortable upping the description of what I did Saturday to aviation photography is that, aside from the static aircraft housed within hangars at the Valiant Air Command's Warbird Museum, I had a chance to shoot a vintage WWII aircraft as it took off for a 30-minute revenue flight around the Space Coast of Florida.

Having been made aware that the VAC's C-47 Skytrain would make a revenue flight at 10:00 a.m. Saturday, I was pumped. Not only would I be able to try getting a decent shot of a WWII veteran aircraft in flight, I would have a chance to test my 600mm f4 lens on the new gimbal from Calumet. The pressure was on, though. Unlike shooting at an air show (which I hope to do someday), I was only going to have one chance to get a clean image of the plane. It was only going to take off once and then only briefly remain in view as it climbed into the heavens. The initial travel down the runway was blocked by trees so the plane was going to be out of sight until just after lifting off the ground. Buildings and trees blocked the view much past landing gear retraction so that gave me a window of 30 seconds or so. There would be no second chance during landing as trees blocked any view of touchdown.

Since I knew squat about aviation photography before heading down to Central Florida, I went to my go-to source for all things photography of which I know nothing - +KelbyTraining.com. I knew that somewhere in the bowels of the site there would be a training video on how to shoot aircraft. I was not disappointed. +Moose Peterson was there, in living color, walking people through the minefield of aircraft photography. The best part is he not only had some great insights into how to shoot static aircraft, but also how to shoot aircraft in flight.

Bear in mind that I have the attention span of a gnat, but after watching Moose's video, three tips on shooting flying aircraft stuck with me: 1) try to capture the aircraft with puffy clouds and blue sky in the background; 2) pan the camera as you shoot to keep the aircraft sharp in the image; and 3) on a prop plane, find a shutter speed that is slow enough to cause the propellers to fully blur in the shape of a completely solid disc shape. Moose suggested something between 1/30th second and no faster than 1/250th second with test shots ultimately determining the right one . Two of the three things were within my control; the third (puffy clouds and blue skies) was not, and wouldn't you know that a thunderstorm cell moved over the airport at 9:00 am and hunkered over it until 10:00 am or so, leaving behind a drab gray sky and no clouds to speak of at flight time.

Nikon D3S, ISO 200, 600mm f4 @ f14, 1/100th second
After the rain stopped and the C-47 was being prepped for roll out from the hangar, I set up the 600mm on the tripod mounted gimbal and hoped for a chance to practice a little panning on any other aircraft that might take off while I waited for the C-47 to take flight. I also wanted to determine the best shutter speed that would blur the props. Thankfully, a small single prop plane taxied to the runway and took off. Heeding Moose's advice, I set the shutter speed to  1/60th second and fired off a couple of shots, scrolled to 1/80th and fired, then to 1/100th and fired, and got to 1/125th before the plane was out of sight. At ISO 200, I was using f14. Panning was sooooo easy with the gimbal I was giddy. A quickly preview of the images confirmed that my panning skills were just barely good enough to keep the plane sharp. The test also confirmed that 1/100th second would be my shutter speed for the Tico Belle.


When the Tico Belle was finally towed out of the hangar and the engines were fired up, I made it a point to take some test shots before the plane taxied to the runway and then again as it taxied away from me to the runway. The stationary images looked good - completely blurred prop with the yellow prop tips creating that desirable circular yellow highlight on the blurred disc. I was a little worried, though, when I looked at the taxi images because the props were not completely blurred in the shape of a disc. I wrote this off (fingers crossed) to the pilot having backed off on the RPM's after start up and hoped that when the engines were at full throttle for take off, the props would blur the way I wanted them to look.


When the Tico Belle finally made its run down the runway and was clear of the trees, I locked in and began to pan. I tried to wait until I saw some semblance of blue sky and clouds as Moose recommended but there were none in the viewfinder. I panned and fired in short bursts until the Belle was out of sight. After downloading the cards, I was very happy with the image sharpness in spite of my spastic panning effort and the props were blurred. Unfortunately, the image backgrounds were horrendous to say the least.

To create the final image, I opened the image above in Photoshop and cropped out the trees.  Next, I made adjustments to the brightness, contrast and color and sharpened some. Using the Transform tool, I rotated the image slightly to give it more of an upward orientation. Then came the tricky part - using the quick select tool to select just the airplane out of the image and then using the refine edge feature to polish up the selection and create a layer (with mask) of just the plane on a transparent background (above).

I now had two choices. Before selection and the layer on a transparent background, I had a decent image of the Belle but a crappy background. Now she was nicely selected in a layer and my first thought was to simply merge the layer down to create a simple white background, add a small rectangular frame around her, and finish the image off with a poster-like text (above). It turned out OK, but just like the TV commercial, I wanted more, I wanted more, I wanted more. I wanted Moose-like puffy clouds and blue sky in the background. OK, back to Photoshop. It was time to skin the cat in a different way.


From the PS menu, I went to File-Automate and opened the un-merged image in my Perfect Effects plug-in. After finding the "Texture - Natural" pre-set, I tried different "Strong Clouds" as a layer and after some fine tuning, sent the image with the layered clouds back to Photoshop (above). Using the brush tool within the layer mask, I brushed all of the clouds and blue sky out of the underlying Tico Belle, bringing her to the forefront surrounded by gorgeous blue sky and Moose-like puffy clouds. Voila, the cat was skinned the way I had hoped my image would look.
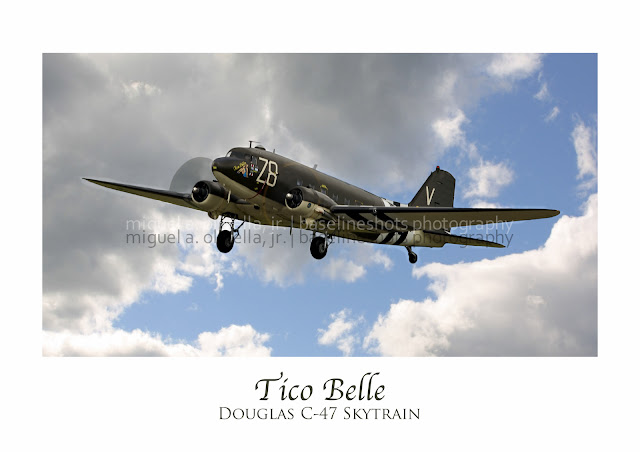

I'm pleased with my first effort at trying to capture a flying aircraft a la Moose even though the weather didn't cooperate and I had to dig into my Photoshop bag of tricks to end up with what I hoped to get in camera. The props are blurred nicely and the panning technique was just good enough to keep the image sharp. It's not perfect by any stretch but a decent first effort from which I can build; and all it cost me was some time and some clicks of the shutter. I'll make that trade any day of the week.