Showing posts with label photo techniques. Show all posts

Wednesday, February 8, 2017

My Love-Hate Relationship With Catwalks

The view of the Tucker Center's basketball court in Tallahassee, Florida from the catwalks above the arena in 2014
Normally, when people talk about being in the nosebleed section of a stadium or an arena it's usually a sarcastic reference to being relegated to crappy seats. When I tell people that I'm headed to the nosebleed section it's not with any sarcasm my voice, it's with a mixture of excitement and fear. You see, my version of being in the nosebleed section of an arena is a bit different and a lot higher than the cheap seats - it's the catwalks that ring arenas high above the facility.

The catwalks and all the steel girders that support the structure
While I'm climbing up and down ladders and ramps, negotiating obstacles, cables, and lights, I am scared beyond words. I don't like heights. Actually, I really, really hate heights. But when I sit at my computer after a game and look through the images that I get from the catwalks, I know it was well worth the effort and the anxiety.

The arena lights just in front of the steel grates that make up the floor of the catwalks
Shooting from  the catwalks is not for the faint of heart. Many photographers set up remote cameras up there and then trigger them from the floor because spending one minute more than is necessary while perched on a catwalk sends shivers down their spines. I refuse to trust a camera's autofocus capabilities, or worse yet pre-focus on a spot and set the camera to Manual Focus, as a way of generating images. I'd rather not hope that a given shot sequence is in focus only to later see if the images are sharp. I prefer to do it old school and actually shoot from above.

The opening tip taken from the side
There are some guidelines I follow when venturing up to the ultra cheap seats ... errr ... catwalks. As far as equipment, I only take one camera body strapped securely around my neck with a lens attached. Since basketball is the sport most frequently photographed from catwalks, I'll concentrate this blog post on shooting basketball from the heavens.

Rebound in the lane, taken from a side angle
For basketball, my lens of choice is usually a 300mm f2.8 that I hand hold. On occasion I will also take a wide angle lens or my 15mm fisheye for artsy stuff. If I take one of these extra lenses, it is stuffed deep into a pants pocket. I leave everything else on the arena floor and that includes camera bags, lens hoods, cell phone, monopod, and anything else that might accidentally be dropped from up above. Not only are these items superfluous, they pose a risk of serious injury (and possibly even death) to the people below if accidentally dropped.

Another shot taken from a side angle
Some arenas do not have catwalks that run directly above either basket nor directly above center court but you can still position yourself to nab some cool stuff. I like to shoot the fisheye or wide angle lens for team introductions or a shot of the venue but after that it is usually put away. The 300mm on a full frame camera body is ideal from up top because it lets me get close enough to the action while still allowing me to follow it so I don't miss too many shots.

The best shots from overhead are when players are looking up at the rim or at the ball
Even if you aren't directly over a basket, image perspective can be altered somewhat in Photoshop to make images look more like they were taken from directly overhead as in the four examples above that were shot from the side.

By moving around the catwalks and changing locations I get different vantage points and thus different images. I shoot some images vertically but most of the time I stick with a horizontal orientation.

Not your usual game action shots but still interesting images that help tell the game's story
If you're lucky, your arena will have a location from which to shoot that offers a view directly over one or both of the baskets, or at least close enough to being directly overhead that your looking straight down at the basket. That is the ideal situation as you can mix some shots from the sides with shots taken directly overhead.

The grate over the center catwalk supported by girders underneath. Top/center of the image depicts a small opening without a grate that is almost directly over a basket at the Tucker Center. That is what I shoot through over the railing
To me the most desirable images are when the players are looking up, such as the opening tip, going for a rebound, about to release a floater in the lane, or just before a dunk. 


Images shot from almost directly overhead of the baskets
But with a little imagination, other images can add some pop to a set or a portfolio and are there for the taking. I didn't know how the images below would look until I downloaded and opened them in Photoshop. As soon as I did I was very glad I did not delete either of them while shooting.


You never know what will take place on the floor below so you have to stay ready
I usually keep an eye on the game clock and anticipating the media time outs. When I know one is approaching, I'll boogie over to a spot directly above one of the teams and wait for the coaches to do their thing. Not your traditional, vanilla time out image but a unique one.


Two versions of a timeout, one where the team uses its bench to sit (top) and the other where seats are placed on the court for the payers to sit (bottom)
If you're fortunate enough to have catwalks available for use, my recommendation is that you give it a go. On your first visit, get there early and get a feel for what it's like up there and explore the vantage points that exist. Take plenty of test shots to dial in the right exposure and then get ready to create some pretty cool images. If you're like me, your heart will be in your throat until you are safely back down on the court but when you download your cards and take a peek at what you got, you'll be glad you did.

Saturday, January 9, 2016

Beauty Without The Beast


When I shoot a model portfolio, if the client does not have a beauty shot, that's where I start the session. Because there's no wardrobe involved and hair is pulled back tight in a pony tail, it takes very little pre-shoot time to get this shot in the can. Makeup is typically benign, mostly eye makeup and some lipstick so again you're shooting within a relatively short period of time after the session begins. The idea for the shot is to emphasize the model's natural beauty without a lot of makeup, accessories, or clothing to compete with the face.


Some photographers set up this shot with only one light, a beauty dish centered, above, and pointed down at the model's face at a 45 degree angle. I use this set up as well but I find that using just this one light creates a noticeable shadow under the model's chin. I have experimented with reflectors, foam core sheets, etc. under the chin but the amount of bounced fill light is just not enough for my taste.  My solution is to add a second light with a small soft box in front of and below the model, angled up at her chin at a 45 degree angle. If the beauty dish is metered at f11, I'll experiment by metering the second light at f5.6, sometimes pushing it up to f8 and even f11, depending on the look I'm after.


Here's the final image with the setup depicted in the previous image. I was going for a very high key kind of look which is easy to accomplish with the lighting setup used. Here are a few more shots from the same session.


For a brighter, super high key effect, try a large soft box instead of a white seamless backdrop and meter it at f11. My 4'x8' soft box is perfect for this and when used it adds a soft envelope of light that wraps around the model's face. Here's an example.


So, whether you go with the super high key look or something a little softer, try using that second light under the chin to eliminate the shadow created by the key light above the model's head.


Friday, June 12, 2015

Multiple Exposures Exposed


At the end of every baseball season, I receive a number of emails and Facebook messages from folks asking me how I create the multiple exposure images I post on line. It's no coincidence that these questions are posed after baseball season. I always seem to shoot multiple exposures during  baseball games and so those are the ones folks see. 

Why baseball? Hmmmmmm. Maybe it's because games last several hours and there's a lot of down time in between the action. Also, after the first few innings of a game I've usually gotten all of the basic shots out of the way - hitters swinging at balls, fielders making plays, et cetera. With several innings left in a game, the only shots to get are of big plays that might change the outcome of the game. So, with a lot of time on my hands I find myself experimenting with my cameras. 

Baseball also lends itself to some multiple exposures as generally speaking the subjects remain within the frame throughout the several exposures needed to create an image. But rather than ponder on the meaning of life, let's chat about how it's done. A little background is in order before delving into the nuts and bolts.

The Good Old Days…Well, Maybe Not So Good….
I've been shooting multiple exposures for a loooooonnnnng time. Believe it or not, there was a time when images were created with something called film, a plastic strip that was coated with a gelatin emulsion that was light sensitive. Housed securely inside the bowels of a camera, images were recorded by the shutter allowing light to pass through the lens and onto the emulsion. Many of my old film bodies had a feature that allowed you to shoot as many images as you wanted to on the same film frame. I would set the film rewind button (normally used to rewind the film back into the canister after shooting up a roll) to the rewind position, push the film advance lever forward as I normally would after snapping an image, and presto - the shutter was reset and ready to take anther image. Because I had set the camera to film rewind, the film would not advance. Pressing the shutter again would therefore record a second image on the same frame of film. This process could be repeated as many times as I wanted.

Unfortunately, you couldn't see what the image looked like until the film was processed, so shooting multiple exposures with film involved a lot of trial and error and a good dose of hope and prayer. I would shoot the same general image several times using different exposures hoping that one of the multiple images was exposed correctly. You see, when shooting multiple exposures, there is a necessary exposure balance that has to be achieved between acceptably exposing each of the multiple images while not overexposing the overall image.  Repeated images on the same frame of film meant letting more and more light hit the film emulsion and we know what can happen when an image is exposed with too much light.

Two Methods For Creating Multiple Exposure Images 
Ah, but the Dark Ages have long since passed and we now have cameras with built in mini computers that do all this work for us. We also have software like Photoshop that allows us to create multiple exposures through layering multiple images on top of each other.

Yep, nowadays a multiple exposure image can be created using two methods - in the camera and in post processing. Which method you decide to use is up to you. You can let the camera do the work and create a multiple exposure image in the camera using its multiple exposure feature, or what I call the easy way. Option 2 is to shoot several images of the same subject in various poses and layer them into one image using Photoshop, or what I'll call the hard way but with much more final-image flexibility. The two methods definitely create different final images so which one you choose to employ will depend on how you want the final image to look and how much time you want to devote to creating it.

A brief caveat - Most Nikon DSLR camera bodies, especially all the ones I use (or have used) have a Multiple Exposure setting in the Shooting Menu. I can't speak for Canon or any other DSLR manufacturer's products. I have heard that until recently, Canon's digital DSLRs did not have a multiple exposure setting but that possibly some of the newest bodies do. If that's the case, you non-Nikonites may or may not have the option of generating multiple exposures in-camera and will be limited to Option 2. Nikon shooters, you're golden.

The Difference Between In-Camera and Post-Processing Multiple Exposure Images
In-camera multiple exposures have a dreamy, ghost-like quality that is difficult to overcome if it's not what one desires. If you want to minimize this you must spend some time in photoshop playing with layers, levels, curves, and contrast. 


The image above was an in-camera multiple exposure with some quality time spent minimizing the dreamy, ghostly quality. The pitcher is still a bit transparent, though, with a bit of the background visible through his body.

Here's a different in-camera multiple exposure without as much of that post processing or ghostly elimination.


Compare the two and you should be able to see what I'm trying to describe. The pitcher in the second image looks a little more dreamy or ghostly. He is much more transparent to the point where you can really see some of the background through his body. Not so much in the lead image, right?

Multiple exposures created in via Option 2, or in Photoshop, can also be made to have this same dreamy, ghost-like look by reducing the opacity of the various layers. But this "look" can be avoided by not reducing the opacity of the layers. With Photoshop, you also have the flexibility of reducing the opacity of some of the layers but not of others, creating a whole different look. 

The Photoshop Method
Let's take a look at a multiple exposure I created by layering several shots into a background and keeping each layer at 100% opacity, creating one final multiple exposure.


Even Tiger has gotten the Photoshop
Multiple Exposure treatment
As you can hopefully see, all of the layers have the same opacity as the background. No dreamy, ghost like quality exists as to the various players yielding a much more contrasty, final image. Basically, what I created is nothing more than a composite image using a background shot with multiple player shots (taken during various games throughout the season) layered onto the background. I chose images of players in poses that would mesh well with each other in the montage and in Photoshop, I followed these steps: 1) "selected" a player from an image using the select tool to cut the player out from its background; 2) created a layer with mask for the selection; 3) dragged that selection/layer into the background image as a separate layer: 4) repeated the process for every other player; 5) moved the selections (layers) around to get them to fit where they looked the way I wanted; 6) adjusted the size of each player via the "Free Transform" feature to proportionally size them and then refined that with some perspective adjustments using the "Transform - Perspective" feature; 7) processed each player layer separately for an even color balance, exposure and sharpness; 8) fine tuned each layer to remove any part of the selection that was outside the lines, so to speak; 9) flattened the layers; and 10) made final adjustments to overall tone, color, sharpness, et cetera of the flattened image.

Whew. It took me almost 20 hours of work to create the image because of the numerous player layers and my obsessive compulsive need to remove every last pixel that was outside each player's "lines".

The next two images illustrate the flexibility you have using the Photoshop method. These are also composites except all of the images were shot in one burst during the same game and during the same pitch. For each one, I used one image as not only an image of the player but also as the background for the final image. After that, creating the overall image followed the same recipe as the basketball image, i.e. selections and layers. Since there weren't as many layers to fine tune, the two baseball images "only" took 7-8 hours apiece to create.


What the two images above also illustrate is the flexibility of using the composite method. In the first image, I chose to reduce the opacity of all but one player image and removed all saturation in the others  to create a black and white backdrop. One image selection, the one I really wanted to stand out, was left at 100% opacity and full color. You can accomplish the same basic effect with an in-camera multiple exposure but it's not as easy. "Selecting" a player that is somewhat transparent is way more challenging so I've always used the composite method to achieve this effect.

Had I wanted to do create the same effect in the second image, only with all the player images in color, I could have easily reduced the opacity of all but one of the player images and left one at full opacity. I just chose not to do that.

The In-Camera Method
One day, when trying to find some God-only-knows feature on one of my camera bodies, I was scrolling through the menus and stumbled across a setting called ... yikes - Multiple Exposures. Huh? You mean I can avoid hours of eye-bleeding, monotonous Photoshop work to create a multiple exposure? No way.

Way. Once I found this little gem in the menu, I was able to navigate through the settings and experiment with them to create multiple exposures. It's beyond easy. It's a snap (actually, multiple snaps if you pardon the pun).


In case you have any trouble navigating through the menu, simply fall back to something that never fails - read the destruction manual. The camera manual for each Nikon body (above, p. 202 & 203 of the Nikon D3S manual) contains a detailed description on how to shoot multiple exposures. Follow the steps and holy moly guacamole....a multiple exposure.

Let me walk you through the various steps in setting the camera as I usually do.

Navigating Through The Menu


Step 1 - Go to the Shooting Menu and scroll down to Multiple Exposure. Use the Multi Selector (press on R side) to activate the next screen.


The default setting is "Off". Scroll up to "On (series)" and press the OK button.
Activate the number of shots selection by pressing on the R side of the Multi Selector. 
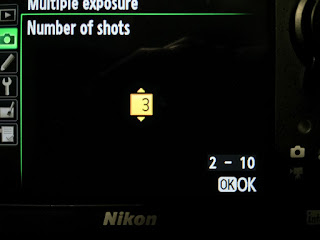
Using the Multi Selector, scroll up or down and choose a number between 2 and 10. I usually select 3. Press OK after deciding on the number of shots.
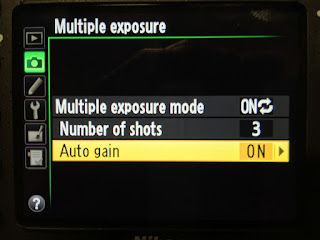
Pressing OK in the prior step takes you back to this menu. Make sure "Auto gain" is on or else you'll have to underexpose your images in order to avoid overexposing the overall image. General rule of thumb is underexposing the image by one stop for each image, so if you select 3 images, underexpose by 3 stops to start out and then adjust from there. I take my chances with Auto gain.
The last step is to simply hit the OK button and the Shooting Menu should pop back up showing that Multiple Exposure is on.


To get the best image, I would suggest you use a fixed platform from which to shoot, i.e. a tripod or a monopod, and try to avoid things or people that move in the background. A tripod works best but it's not impossible to get a decent multiple exposure with a monopod as I did in the images above and below. The reason for a stable platform that doesn't move and not having things that can move in the background is to give you a constant background in all of the exposures. If you notice in the image above, I was not able to keep the background constant. The players in the background are exposed in different poses from my movement of the monopod, their movement during the sequence, or both. Since I was shooting at f2.8 with very little depth of field, they're blurred, I don't think it's any big deal but you may want something more constant. If so, just use a tripod. But bear in mind that the background people may move during the sequence so even a tripod will not guarantee a constant background when people are in the mix.


As I mentioned previously, depending on how much contrast and adjustments you employ in final processing of the camera-made multiple exposure (through Photoshop adjustments like levels, curves, contrast, etc.) you can improve the amount of definition of the multiple-exposed subject has in the overall image and reduce the transparency. In the first image above (batter), I opted to go with a lot of definition so I made several adjustments that accomplished that. In the image directly above (pitcher), I went with a more artistic, softer overall effect so I did not use a lot of adjustments.

After experimentation with the camera, I've decided that for sports images, using a three-shot camera-made multiple exposure is just about right. I've tried more (5-7) and the images look too busy for my taste but you may find that you like additional exposures. As for actually shooting the images, I've used  the Continuous Low burst mode and set it to 5 frames per second as well as the single shot mode and pressed the shutter each time I wanted to freeze the subject. You can decide which way works best depending on how fast the subject is moving and go with what you see fit. Most of the time I'll push down on the shutter to initiate the multiple exposure when the pitcher (or batter) is set and then fire away as the throw/swing began. After 3 exposures, the camera knows it's all done and a quick peek on the back of the camera will show you the final, multiple-exposed product.

Some camera bodies will revert back to standard shooting mode after the sequence is finished so if you want to give it another go you must go back to the Menu and re-enable the Multiple Exposure mode.

Also, while shooting in Continuous mode, you don't have to hold the shutter down once you initiate the first exposure. You can release the shutter and re-engage it any time you want as long as you haven't shot all of the images in the sequence. You choose when you want each of the exposures to be recorded by pressing/releasing the shutter any time you want. For example, you could shoot one frame when the batter steps to the plate, wait until he's set and then fire the rest of the frames as he swings; or you could fire a second frame once the swing is initiated and then wait until the swing is completed to get the third frame off. The camera will stay in Multiple Exposure mode until all of the exposures you selected have been shot.

Could it possibly be any easier? Nope. Experimentation will allow you to come up with your own recipe for images. Now just go out there and try it. But let's keep how easy it is to create multiple exposures our little secret. We don't want anyone to think that it's this easy to create some pretty cool images.

Tuesday, June 9, 2015

iPhone Panoramas…Let's Get Vertical

iPhone Vertical Panorama, La Sagrada Familia in Barcelona
Here's a test for you…. Can you tell the difference between an iPhone panorama (using the iPhone panorama feature) and one created by shooting a series of overlapping images and then stitching them together in Photoshop? One of the panoramas below was shot with an iPhone, the other with a DSLR shooting several vertical, overlapping images that were stitched together. See if you can tell the difference.


If you picked the first image as the iPhone panorama and the bottom one as the DSLR image, you picked correctly. If I hadn't shot both images, I couldn't have picked which one was which. In fact, I had to check the EXIF data for the images just to make sure I got it right.

iPhones and other cell phone cameras have changed photography in a lot of ways. No longer do we have to carry a camera with us to capture those fleeting Kodak moments. Who doesn't have a phone in their pocket or purse than can be whipped out and used on a moment's notice? And as cell phone camera technology has grown by leaps and bounds, the image quality of a cell phone image will rival that of a lot of point and shoot digital cameras.

Until recently, I never used my iPhone camera for anything other than the occasional quick shot if I didn't have a DSLR on hand. But with the advent of the panorama feature on my iPhone camera, I find myself using my it to capture panoramas to supplement whatever I'm shooting with my DSLR's.


I mentioned image quality a moment ago. One of the reasons why I hardly ever used my cell phone camera for anything seriously photographic was the small file sizes that didn't lend themselves to reaching print quality, i.e. generating an image size at least 8 1/2 X11 at 300dpi after cropping. That image size is approximately 5MB. iPhone panoramas (with my iPhone 6) generate file sizes that are well over 20MB, easily meeting my threshold for print quality so I no longer hesitate to grab my iPhone when a panorama is in order.

Full frame fisheye shot cropped as a panorama - Nikon D3S, 15mm f2.8 fisheye lens
Did I mention that I loooooovvvvveeee panoramic shots?  I've always been a big fan of any kind of image that depicts more than what a viewer is expecting to see. That's one of the reasons I love my fisheye lens - I dig the super wide angle view it captures with the added curvature that catches peoples' attention. Panoramas fall into the same category and my iPhone makes it oh so easy to create a panoramic image of acceptable quality.

Typical iPhone panorama orientation
But I've seriously digressed. What I really wanted to write about was a new twist I recently discovered by accident while shooting panoramas with my iPhone. Your basic, garden variety panorama is shot horizontally, moving the phone from right to left or left to right, depending on how you have it set. You hold the phone in a vertical orientation, press the shutter button, and move the camera from side to side. When you've reached the end of what you want in the image you just push the shutter button again and voila, a 20-30MB panorama.

The other day, I was all set to shoot a panorama and accidentally hit the shutter button while I was holding the phone in a horizontal orientation. As an image was unknowingly being recorded I moved the phone in an upward direction. When I realized that I had pressed the shutter button, I pressed the shutter button again and saw the image that was generated…you could have knocked me over with a feather - a vertical panorama! Why hadn't I thought to do that before?

That got me thinking. There have been many times when I wanted to fit something tall in a frame but the only way to do it was to shoot my DSLR vertically and hope I had a sufficiently wide lens to get it in the frame. But sometimes I just didn't have a lens that was wide enough. Option 2 was to keep backing up until everything fit in the frame, but sometimes that wasn't possible.

Orientation for shooting a vertical panorama
Enter the vertical iPhone panorama. I can just hold the camera horizontally in panorama mode and move the camera up (or down, depending on where I start the frame) until I've got everything I want in the frame.

The scene in the iPhone image above (final image on the right) was my first, intentional vertical panorama. It was a test to see what would happen with a really tall building as my subject but with stuff (people) in the foreground that I also wanted to include in the image. We were outside the Cathedral in Barcelona where on Sunday mornings people gather and join in a traditional Catalan folk dance called the Sardana. I pulled out my iPhone, set it to panorama mode, held the phone horizontally, pressed the shutter button, and moved the phone upward until I had gotten the people dancing and the entire height of the Cathedral in the frame.Not too shabby, I thought to myself. Then the wheels in my little head really started spinning. What would images look like, say inside a Cathedral, and I moved the phone from ground level all the way up to an overhead orientation? That would capture not only the altar but possibly the gorgeous, unique ceilings that decorate such buildings. La Sagrada Familia Cathedral in Barcelona with its Gaudi-gaudy features would be the perfect opportunity to get vertical, so to speak, and by coincidence we were headed there for a visit the next day.

As soon as we arrived at La Sagrada Familia, I made a bee line for a spot directly in front of the altar, just to one side, and shot a vertical panorama that captured the scene until just below the ceiling.It was an interesting image (below) but I wanted to push the envelope.

La Sagrada Familia, floor to below ceiling
Moving over for a side view of the altar, I started the vertical panorama with the altar in view but didn't press the shutter button again until I had moved the phone directly over my head. The image on below is the result, something I had never envisioned, a truly unique image that I would have never gotten had I not accidentally found a way to shoot vertical panoramas with my phone.

Side angle including the ceiling overhead
Not wanting to stop there, I went back to my original position and stood directly in front of the altar. I wanted to try one more experiment, a full 180 degree attempt of the Cathedral's interior that included the scene in front of me, the entire ceiling, and the scene behind me. I started the image directly in front of me, moved the phone all the way up until it was overhead, and then continued to rotate the phone until it was facing the opposite direction of where I started. In other words, a full 180 degrees from start to finish, capturing the entire Cathedral interior from the front wall to the back wall.

This is what it looks like.


Because photos were not allowed to be taken from a spot smack dab in the middle of the Cathedral, I wasn't able to get the center of the ceiling centered in the image - it's off center to the right (or actually, bottom since I've rotated the image from a vertical orientation to horizontal). But my experiment verified that a 180 degree vertical panorama was not only possible, it created an image that has a unique visual effect.

As opportunities present themselves, I plan to continue trying different vertical panoramas as I think I've just scratched the surface in terms of possibilities. For now, I thought I'd pass this technique along in case you think it might be useful to you.